PDQ provides several ways to optimize package deployment and streamline performance. The following sections provide suggestions for ways to fine tune deployment settings depending on your system resources and configuration:
•Managing the Number of Concurrent Targets for Deployment
•Managing How Files are Copied During Deployment
•Throttling Deployment Bandwidth
•Deploying to Targets with Variable IP Addresses
•Managing Deployment Timeout Intervals
•Managing How PDQ Deploy Handles Offline Computers
Managing the Number of Concurrent Targets for Deployment
In Enterprise mode, PDQ Deploy can deploy to multiple targets concurrently and it can run multiple deployments concurrently. You can limit the maximum number of concurrent targets per deployment and the maximum number of concurrent targets (multiple deployments) based on your server capacity and available resources.
With a well-apportioned server that has a generous allocation of available memory and processing cycles, the highest setting possible would be 500 Concurrent Targets per Deployment and 2000 Total Concurrent Targets. However, please note that in addition to consuming significant amounts of memory and processing cycles, concurrent deployments are going to impact the Network Interface Card (NIC). The NIC may be able to handle 500 concurrent deployments of small packages, but if you attempt to deploy a large package such as Microsoft Office to 500 targets concurrently, the NIC will crash. Therefore, it is recommended that you do not set Concurrent Targets per Deployment higher than 72.
To manage the number of concurrent targets:
1.Click Options > Preferences or press Ctrl+Comma.
2.In the Preferences window, select Performance.
3.Set the Concurrent Targets per Deployment.
This setting defines the maximum number of targets that can be deployed concurrently for each deployment. The higher the number, the more server memory, CPU resources, and network bandwidth required.
The default setting is 8.
Note: This number cannot be higher than the Total Concurrent Targets.
4.Set the Total Concurrent Targets.
This setting defines the maximum number of concurrent targets in total (multiple deployments). The higher the number, the more server memory, CPU resources, and network bandwidth required.
Once this limit is reached, no more targets receive deployments until others have finished. The default is 32.
5.Click Close.
Managing How Files are Copied During Deployment
When PDQ Deploy deploys a package, it first copies the package files to the target. The file copy can be performed in Push or Pull mode.
Push mode copies files to the target computers from the computer where PDQ Deploy is installed. Push mode is recommended over pull mode if the package files are located on the PDQ Deploy computer. Push mode is the default copy mode.
NOTE: In Push mode, bandwidth throttling applies to all simultaneous file copies combined.
Pull mode sends lists of files to the target computers which then pull the files from a centralized location. Use Pull mode if the package files do not reside on the PDQ Deploy console computer. Otherwise, PDQ Deploy first copies the files to the local PDQ Deploy console, then to the target computer. Using Pull mode avoids unnecessary copies and it improves deployment performance.
NOTE: Pull mode is available only in Enterprise mode.
IMPORTANT: For Pull mode to work, all files must be accessible using a UNC path (e.g. \\server\share\installer.msi). Files on local or mapped drives are not accessible to the target computers.
NOTE: Bandwidth throttling is not enforced when using Pull Copy Mode.
Pull mode may also be used to improve deployment performance in WAN environments. Using Microsoft Distributed File Services to replicate the PDQ Deploy repository to file servers across your WAN environment and setting copy mode to Pull, you can deploy packages from the file servers that are closest to the target computers.
VIDEO: PDQ Live! Utilize DFS Replication with PDQ Deploy

(https://support.pdq.com/hc/en-us/articles/115000337272)
VIDEO: PDQ Deploy: Understanding Push and Pull Deployments
(https://support.pdq.com/hc/en-us/articles/220538467)
Setting the Default Copy Mode
The default Copy Mode is set in Preferences. This setting is the system default for all packages deployed from the current PDQ Deploy console.
To set the default Copy Mode:
1.Click Options > Preferences or press Ctrl+Comma.
2.In the Preferences window, select Performance.
3.Under Copy Mode, select Push or Pull.
It is best practice to set the default Copy Mode in Preferences to Push. It is recommended that you apply the Pull Copy Mode at the Package level when the associated package files do not reside on the local PDQ Deploy console.
4.Click Close.
Setting Copy Mode for Individual Packages
It is recommended that you apply the Pull Copy Mode only at the Package level when the associated package files do not reside on the local PDQ Deploy console.
NOTE: Pull mode is available only in Enterprise mode.
To set the Copy Mode at the Package level:
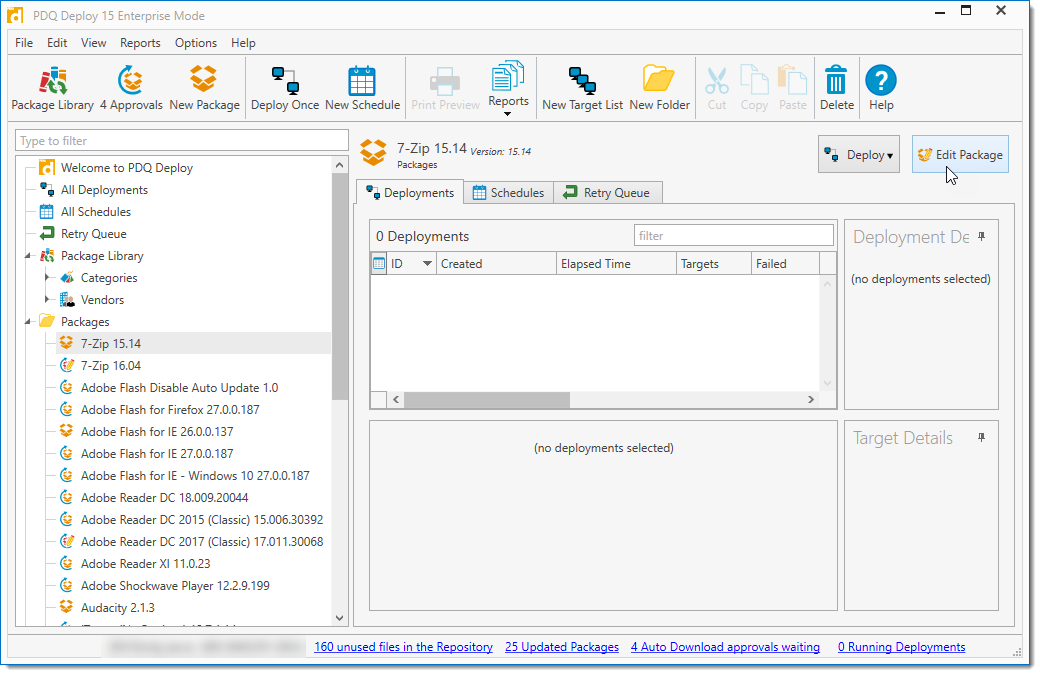
1.In the tree, select the package you want to manage.
2.Click ![]() Edit Package or double-click the package name.
Edit Package or double-click the package name.
3.Select ![]() Package Properties in the Step list.
Package Properties in the Step list.
4.Click the Options tab.
5.Click the Copy Mode pull-down menu, then select the Copy Mode you want to apply to the current package.
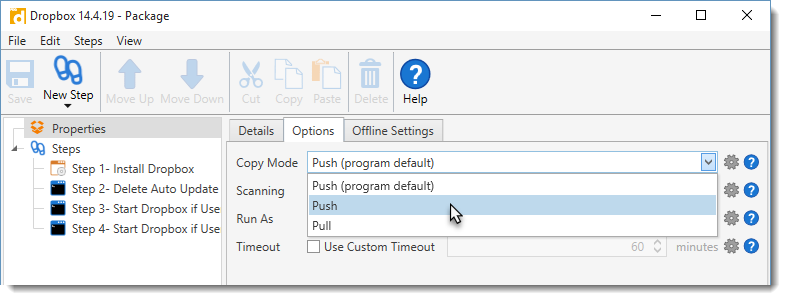 |
6.Click ![]() Save on the toolbar.
Save on the toolbar.
The Package setting overrides the default Copy Mode defined in Preferences.
Throttling Deployment Bandwidth
Copying package files to target computers during deployment can quickly eat up network bandwidth, particularly when running concurrent deployments or deploying over slow links. To protect your network bandwidth, you can limit the percentage of available bandwidth PDQ Deploy consumes when it copies package files to target computers.
IMPORTANT: Bandwidth throttling applies only when pushing files from the PDQ Deploy console computer (see Managing How Files are Copied During Deployment above). If you are deploying files from other systems using Pull Copy Mode, then PDQ Deploy cannot manage the bandwidth on the remote system.
The throttling works based on a percentage of available bandwidth, with the default rate being 50%. This limit is achieved by ensuring that the server waits between packets long enough to keep its utilization below the given threshold. Therefore, even if the server is copying to a computer on the same subnet and a computer over a slow WAN, it keeps 50% headroom on each link.
IMPORTANT: The Bandwidth Limit applies to all simultaneous file copies combined.
To limit bandwidth when pushing files from the PDQ Deploy console computer:
1.Click Options > Preferences or press Ctrl+Comma.
2.In the Preferences window, select Performance.
3.Under Copy Mode, select Push.
When you select Push, the Bandwidth Limit option becomes available.
4.Set the Bandwidth Limit to the percentage of available bandwidth you want to allot for deployments.
The default bandwidth limit is 50%. If set to 100%, then no limit is imposed and the file copy operation takes as much bandwidth as is available.
5.Click Close.
Deploying to Targets with Variable IP Addresses
If your organization uses variable IP addresses or you have computers that frequently change IP addresses (such as roving laptops), then the targets may have multiple addresses in DNS. Enabling the Test Multiple Addresses in Name Resolution option in Preferences improves the success rate of deployments in these environments because PDQ Deploy pings each address registered to the target computer, then deploys to the first address that responds. If you do not enable this option, PDQ Deploy tests only the first address provided in DNS.
IMPORTANT: You do NOT need to enable this option if your organization uses static IP addresses.
To configure PDQ Deploy to ping IP addresses before attempting deployment when multiple IP addresses are registered to a single target:
1.Click Options > Preferences or press Ctrl+Comma.
2.In the Preferences window, select Performance.
3.Select Test Multiple Addresses in Name Resolution.
Enable this option only if your organization uses variable IP addresses or you have computers that frequently change IP addresses.
4.Click Close.
Managing Deployment Timeout Intervals
One way to optimize deployment performance is to effectively manage timeout intervals. The timeout interval specifies how many minutes deployments should run before being timed out by the server. The timeout interval applies only to the duration of a deployment to a target computer; it does not include the initial process of copying installation files to the target.
The global timeout interval is defined in Preferences; exceptions can be defined in individual package properties. When configuring your local system, it is best practice to set the shortest timeout interval as the global default in Preferences and increase the timeout interval only in individual packages. For example, if you typically deploy small packages such as browser, Java, or Adobe reader updates, you may choose to set the global timeout interval to 20 minutes. You could then increase the timeout interval for individual packages that take longer to install such as a Windows Service Pack or a package containing many nested packages.
Setting the Global Deployment Timeout Interval
The global timeout interval is set in Preferences. This setting is the system default for all packages deployed from the current PDQ Deploy console.
To set the global timeout interval:
1.Click Options > Preferences or press Ctrl+Comma.
2.In the Preferences window, select Deployments.
3.Set the Timeout interval.
The default value is 60 minutes. It is best practice to set the shortest timeout interval as the global default in Preferences and increase the timeout interval only in individual packages.
4.Click Close.
Setting Deployment Timeout Intervals for Individual Packages
When configuring your local system, it is best practice to set the shortest timeout interval as the global default in Preferences and increase the timeout interval only in individual packages that may take longer to install such as a Windows Service Pack or a package containing many nested packages.
To set deployment timeout intervals for individual packages:
1.In the tree, select the package you want to manage.
2.Click Edit Package ![]() or double-click the package name.
or double-click the package name.
3.Select Package Properties ![]() in the Step list.
in the Step list.
4.Select Use Custom Timeout, then set the custom timeout interval for the current package.
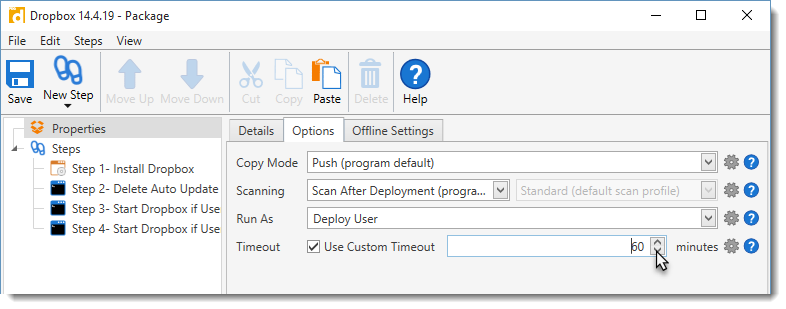 |
5.Click Save ![]() on the toolbar.
on the toolbar.
The Package setting overrides the global timeout interval defined in Preferences.
Scanning After Deployment
After PDQ Deploy completes a deployment, you can configure the program to automatically initiate a PDQ Inventory scan. This is a powerful feature and highly recommended for maintaining up-to-date inventory of target machines. While the deployment history tells whether or not a deployment was successful, PDQ Inventory can tell you exactly what applications and versions are installed on the target computers. PDQ Inventory can also collect information on hardware and Windows configurations.
IMPORTANT: This feature is available only in Enterprise modes and it requires PDQ Inventory in Enterprise mode. If you are running in Client Mode, PDQ Inventory must be installed on both the Client computer and the Server computer. Additionally, the target computer must already be in PDQ Inventory with a name or hostname that matches the name used in PDQ Deploy.
You can configure inventory scans globally in Preferences or at the package level. You can also configure inventory scans when setting up a deployment using Deploy Once or Schedules.
Configuring Global Inventory Scan Settings
To configure PDQ Deploy to automatically launch a PDQ Inventory scan after deployment:
1.Click Options > Preferences or press Ctrl+Comma.
2.In the Preferences window, select Deployments.
3.Select Scan After Deployment.
4.Click the pull-down menu to choose the scan profile you want to run after deployment.
The default scan profile is defined in PDQ Inventory in Preferences > Scan Profiles. You can choose to scan with any scan profile that has been configured in PDQ Inventory. It is common to use either the Applications or Standard scan profiles.
5.Click Close.
Configuring Package Inventory Scan Settings
The global inventory scan setting in Preferences may be overridden in the individual Package Properties. For example, if you have a package that doesn't install an application, then you may want to disable inventory scanning in at the individual package level.
To configure inventory scan settings at the Package level:
1.In the tree, select the package you want to manage.
2.Click ![]() Edit Package or double-click the package name.
Edit Package or double-click the package name.
3.Select ![]() Package Properties at the top of the Step list.
Package Properties at the top of the Step list.
4.Click the Scanning drop-down menu to specify the scan settings for the current package.
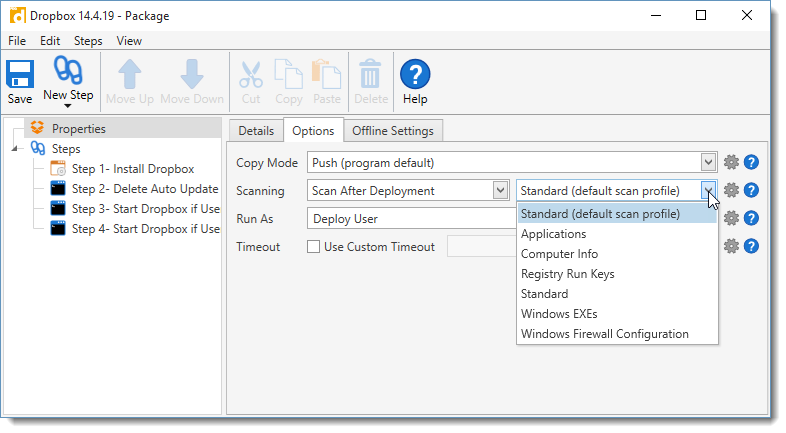 |
5.(Conditional) If you have enabled scanning for the current package, you can select the scan profile you want to run after deployment.
The default scan profile is defined in PDQ Inventory in Preferences > Scan Profiles. You can choose to scan with any scan profile that has been configured in PDQ Inventory. It is common to use either the Applications or Standard scan profiles.
6.Click ![]() Save on the toolbar.
Save on the toolbar.
Configuring Deploy Once Scan Settings
The global inventory scan setting in Preferences and the individual Package Properties may be overridden. For example, if you want to deploy a package quickly and want to disable inventory scanning at the time of deployment.
To configure inventory scan settings at the time of deployment:
1.In the tree, select the package(s) you want to deploy.
2.Do one of the following:
•On the Toolbar, click Deploy Once ![]() .
.
•Click File > Deploy Once (or press Ctrl+D or right-click and select Deploy Once).
•On the selected Package window, click Deploy > Deploy Once.
•If multiple packages are selected, on the Multiple Packages page, select Start a deployment with these packages.
A new Deploy Once window opens.
3.On the Options tab, click the Scanning drop-down menu to select the scan settings for the deployment.
4.Click Deploy Now.
Configuring Schedule Scan Settings
To configure inventory scan settings for a deployment schedule:
1.On the Main Console window, select the package or packages (Shift+click or Ctrl+click) you want to deploy.
You can also create a new schedule without any packages and then attach one or more packages later (see Editing Packages). You can also nest packages to include multiple packages (see Nested Package Step Properties).
2.Do one of the following:
•On the Toolbar, click New Schedule ![]() .
.
•Click File > New Schedule.
•Right-click the package (or one of the selected packages) and select New Schedule.
•On the selected Package window, click Deploy > New Schedule.
•If multiple packages are selected, on the Multiple Packages page, select Create new schedule with these packages.
A new blank Schedule window opens on the Triggers tab.
3.On the Options tab, click the Scanning drop-down menu to select the scan settings for the deployment.
4.Configure the remaining sections of the schedule.
5.Click OK.
Managing How PDQ Deploy Handles Offline Computers
PDQ Deploy provides several options to manage computers that are offline during deployment. The following table provides a brief description of each option and its associated advantages. For additional information on managing offline computers, see Handling Offline Target Computers for Deployments.
Offline Settings |
Description |
|
Heartbeat Schedules |
Heartbeat is a PDQ Deploy schedule trigger that deploys packages to target computers when they come online. NOTE: This feature requires Enterprise mode in both PDQ Deploy and PDQ Inventory. PDQ Inventory detects when the status of computers change from offline to online. This status change triggers the Heartbeat scheduled deployment in PDQ Deploy that is linked to the PDQ Inventory target computers or PDQ Inventory collections. For details on scheduling a Heartbeat deployment, see Deploying When Target Computers Come Online with Heartbeat Schedules. |
|
Offline Status |
The Offline Status is used to determine whether or not target computers will receive a ping or Wake-on-LAN prior to deployment. |
|
|
Ping before deployment |
Performs a ping (ICMP echo) before attempting the deployment. If the target does not respond to the ping within 2 seconds, then the deployment is not attempted on that target. Enabling this option can increase the overall speed of the deployment because PDQ Deploy doesn’t waste time with offline computers. NOTE: Typically, the ping should take only a few milliseconds. However, if your DNS isn’t solid or your network is experiencing latency issues, then the ping response may take more than 2 seconds. When this is not selected, PDQ Deploy attempts the deployment regardless of the online or offline status of the target computer. Leaving this unchecked can increase the overall speed of the deployment because time isn't wasted with offline computers. If the target is offline or otherwise unavailable, then Windows will timeout after ~60 seconds. |
Send Wake-on-LAN and attempt deployment |
Attempts the deployment then sends a Wake-on-LAN to offline target computers. The deployment is attempted again if it comes online. After 5 minutes if the computer is still offline, the deployment will be attempted again. The advantage of this feature is that offline computers can immediately be made available for deployment. However, it can increase deployment time. IMPORTANT: This feature is available only in Enterprise mode of both PDQ Deploy and PDQ Inventory. Furthermore, PDQ Inventory must have the MAC address of the target computers’ NICs. |
|
Retry Queue |
The Retry Queue is a deployment queue for target computers that are unreachable or offline during a deployment. The deployments are held in the Retry Queue and deployment is retried as per the following configured parameters. IMPORTANT: The Retry Queue is available only in Enterprise mode. For details on the Retry Queue, see Using the Retry Queue for Offline Computers. |
|
|
Put Offline Targets in Retry Queue |
Enables the Retry Queue. By default, target computers that are unreachable or offline during a deployment are held in the Retry Queue and deployment is retried. This global setting can be overridden in the individual Package and Schedule properties. The advantage of this feature is that offline computers are automatically queued for re-deployment. This simplifies the process of ensuring that critical updates are deployed to all target computers. However, it is recommended that you enable this option per package or deployment rather than applying it globally in Preferences. Do not enable this option for packages that reboot the target computer. |
Allowed Retries |
Sets the number of retry attempts for an offline computer. This applies per target per deployment. The default setting is 72. To set unlimited retries, set this value to 0. This global setting can be overridden in the individual Package and Schedule properties. |
|
Retry Interval |
Specifies the amount of time between deployment retry attempts. The default setting is 1 hour. The minimum interval setting is 15 minutes. The Retry Interval is a global setting. |
|
To configure these options globally in Preferences:
1.Click Options > Preferences or press Ctrl+Comma.
2.In the Preferences window, click Deployments.
3.Configure the settings for offline computers.
4.Click Close.
Filtering Target Computers
PDQ Deploy target filters allow you to set up global rules to manage which computers each PDQ Deploy console can deploy to. Target filters can limit which computers may be included in deployments executed from a given console or they can be used to exclude computers from all deployments on that console. In enterprise environments with multiple PDQ Deploy administrators, target filters are an effective way to distribute administration.
IMPORTANT: Target Filters are available only in Enterprise mode.
Exclusion filters prevent deployment to any computer that matches the listed filters. For example, if you have a filter for the Host Name HQDC-1, then any deployment to a Host Name called HQDC-1 is not attempted. (Wildcards may also be used, such as HQDC*)
Inclusion filters prevent deployment to any computer that doesn't match any of the listed filters.
NOTE: Inclusion Filters are usually unnecessary. If an Inclusion Filter exists for a computer name “Trixie”, then only computers that are named trixie can receive a deployment. It is more common to use the Exclusion Filters to prevent accidental deployments to important computers such as domain controllers, SQL servers, etc.
When PDQ Deploy processes a deployment, it first checks if there are any inclusion filters. If there are and none of the filters match the target computers, then the deployment is blocked.
Next, PDQ Deploy checks the exclusion filters. If there is a match, then deployment is blocked. Otherwise, PDQ processes the deployment as normal.
Video: Deployment Target Filters (Inclusions and Exclusions)
(https://support.pdq.com/hc/en-us/articles/220538567)
To define a target filter:
1.Click Options > Preferences or press Ctrl+Comma.
2.In the Preferences window, click Target Filters.
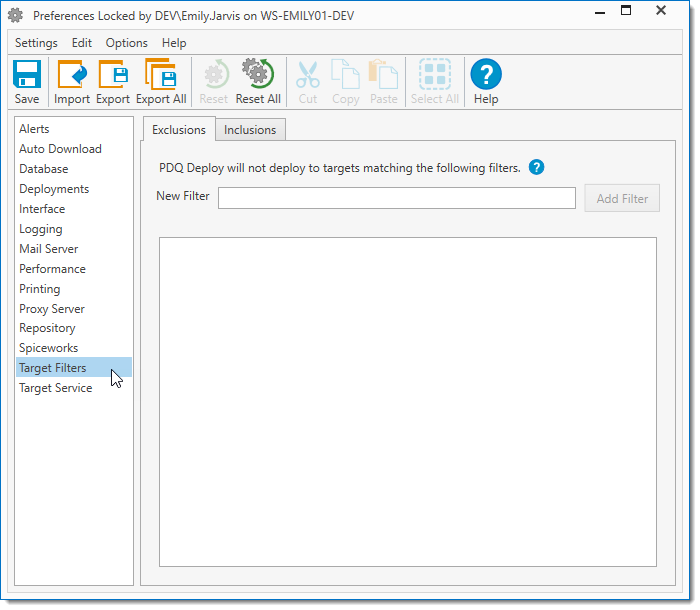
The Target Filters page allows you to define both inclusions and exclusions for target computers.These filters are global settings; they apply to all deployments executed on the current PDQ Deploy console.
3.Select either the Exclusions or the Inclusions tab:
•Select the Exclusions tab if you want to prevent deployments to specific computers.
•Select the Inclusions tab if you want to limit deployments to specific computers.
4.In the New Filter field, enter the name or IP address of a computer you want to add to the filter.
To exclude a range of computers, you may enter a subnet.
5.Click Add Filter to add the computer or subnet to the target filter.
6.(Optional) Repeat steps 4-5 to add multiple computers or subnets to the filter.
7.(Optional) To remove a computer or subnet from the Target Filters list, select the Host Name and press Delete or right-click the Host Name and click Delete.
8.When finished, click Close.
Hereafter, the designated filters are applied to all deployments executed on the current PDQ Deploy console.
© 2018 PDQ.com Corporation. All rights reserved.
PDQ.com is a trademark of PDQ.com Corporation. All other product and company names are the property of their respective owners.
Help Version: 17.1.0.0