A PDQ Deploy Package contains the instructions and the files needed to silently install an application, run scripts and commands, or reboot target computers using PDQ Deploy. This section describes how to create and configure custom packages.
To create a Package, start on the Main Console window and click File > New Package or the New Package ![]() button (or press Ctrl+N). A new Package window opens—this is where you configure the package. For an introduction to the Package window, see Package Window.
button (or press Ctrl+N). A new Package window opens—this is where you configure the package. For an introduction to the Package window, see Package Window.
An alternative to creating a new package from scratch is to base a new package on a prebuilt package downloaded from the package library. Duplicate and rename a package that is similar to the new package you need, then edit it to meet your requirements. Examining prebuilt packages is also a great way to learn how packages are constructed and configured. For information about duplicating and editing packages, see Managing Packages.
The creating a new package procedure includes the following parts:
•Part 2: Install Step Properties
•Part 3: Conditions and Options
•Part 5: Adding Additional Steps
VIDEO: Building a Package in PDQ Deploy

(https://support.pdq.com/hc/en-us/articles/115000016811)
Part 1: Package Properties
To create a new PDQ Deploy package:
1.On the PDQ Deploy Main Console window, click New Package ![]() on the toolbar (or click File > New Package or press Ctrl+N).
on the toolbar (or click File > New Package or press Ctrl+N).
A new blank Package window opens with the Detail tab of the Package Properties selected.
NOTE: While using Central Server, if you wish to create the package privately, select the Private Packages folder ![]() first. If the package is created outside the Private Packages folder, it is available for public use. You can simply drag the new package into the Private Packages folder to make it private and then delete the original.
first. If the package is created outside the Private Packages folder, it is available for public use. You can simply drag the new package into the Private Packages folder to make it private and then delete the original.
2.On the Details tab, type the name, version, and description for the package.
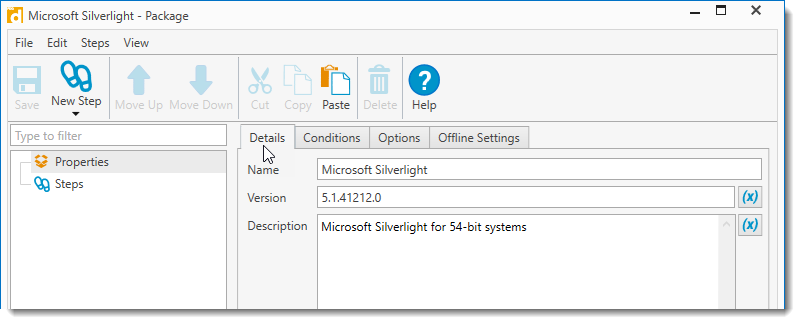 |
You are likely to create many packages so it’s important to name them clearly and consistently. We suggest using names that include the product, version, and other important information. It's also important to provide descriptions that explain the purpose of the package. URLs added in this field will become hyperlinks after pressing the spacebar, or after closing and reopening the package. For additional guidance look at packages in the Package Library.
NOTE: Generally you can include 64-bit and 32-bit applications in the same package. For the example used in this procedure, we are creating a simple custom package for the 64-bit version of Microsoft Silverlight only.
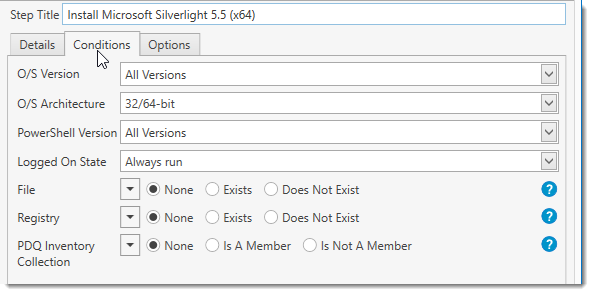
3.Click the Conditions tab.
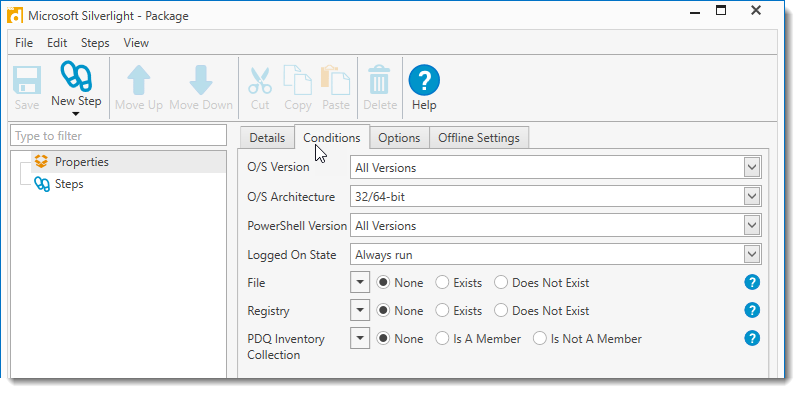
4.(Optional) Click the O/S Version list to change the Windows version(s) on which the package will run.
5.(Optional) Click the O/S Architecture list to select whether the package will run on 32-bit, 64-bit, or both types of systems.
6.(Optional) Click the PowerShell Version to select the PowerShell version or versions on which the package will run.
IMPORTANT: PowerShell version 1 is not supported in PDQ Deploy.
7.Click the Logged On State list to determine if the package runs based on whether or not the user is logged on to the target computer.
The options are shown in the following table:
Condition |
Description |
Always Run |
Run the package regardless of logged on state. |
Only run if no user is logged on |
Only run the package if no users are logged on. |
Only run if a user is logged on (including Locked and Disconnected) |
Only run the package if a user is logged on. This includes locked or disconnected sessions. |
8.(Conditional) Click the File Exists or Does Not Exist if you would like to ensure a file exists or does not exist on the target computer before running the package.
| For example, using the File Exists condition: Run only if Chrome.exe version is greater than 50 and product name equals Google Chrome. |
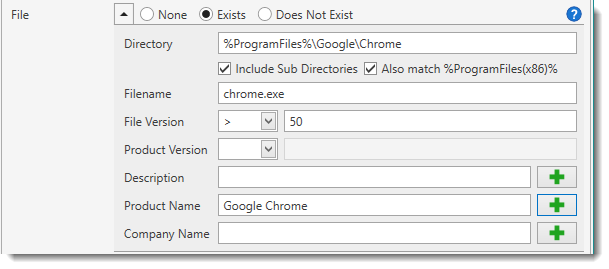
The File options are shown below:
File Options |
Description |
None |
Select to disable the file condition. |
Exists |
Select to search for an existing file before running the package. |
Does Not Exist |
Select to ensure there is no such existing file before running the package. |
Directory |
Enter the directory where the file exists on the target computer. This directory can include environment variables. NOTE: Environment variables will be evaluated in the context of the Local System rather than the user. For example, the %TEMP% environment variable will evaluate to %SystemRoot%\TEMP instead of %USERPROFILE%\AppData\Local\Temp. |
Includes Subdirectories |
Check to include all the subdirectories of the directory above. |
Filename |
The name of the file. IMPORTANT: The first filename that is matched will be used. For example, you set a Does Not Exist File condition for C:\Temp\Fancyfile with a version of 1.5. There are two instances of Fancyfile. The File Condition locates the first file, Fancyfile version 1.25, thereby returning true (does not exist) even though the other Fancyfile version 1.5 does in fact exist. |
File Version |
The version of the file from its header, if present. This filter can be equal to, less than, greater than, less than or equal to, greater than or equal to. If left blank, this will disable the file version. |
Product Version |
The version of the product from its header, if present. This filter can be equal to, less than, greater than, less than or equal to, greater than or equal to. If left blank, this will disable the file version. |
Description |
The description of the product from its header, if present. Can use the standard * and ? wildcards. |
Product Name |
The product name of the product from its header, if present. |
Company Name |
The company name of the product from its header, if present. |
9.(Conditional) Click the Registry Exists or Does Not Exist if you would like to ensure a registry entry exists or does not exist on the target computer before running the package.
IMPORTANT: The registry option does not work for data that spans multiple lines.
| For example, using the Registry Does Not Exist condition: Run only if UpdateDefault value of 0 does not exist. |
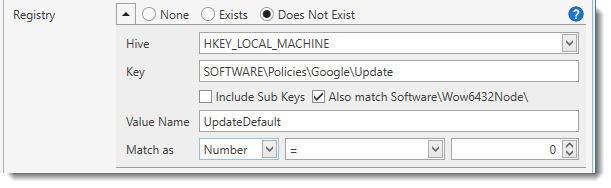
The Registry options are shown below:
Registry Options |
Description |
None |
Select to disable the registry condition. |
Exists |
Select to search for an existing registry keys before running the package. |
Does Not Exist |
Select to ensure there is no such existing registry keys before running the package. |
Hive |
Choose between HKEY_LOCAL_MACHINE, HKEY_CLASSES_ROOT, and HKEY_USERS. |
Key |
Path of the key to look in. |
Include Sub Keys |
Looks also in all sub keys. |
Value Name |
Name of the value to match against. If the value name is left blank then the value of the key itself will be used. IMPORTANT: The first value name that is matched will be used. For example, using the Exists registry condition you search for printer IP addresses in HKLM\SYSTEM\CurrentControlSet\Control\Print\Printers with a 'port' value that contains the IP address of 192.168.0.100. Printer A is a software printer with a port in C:\ProgramData\PrintProgram\PortFile. Printer B has the port of 192.168.0.100. Because Printer A’s 'port' value is listed first, that is the value that is returned, hence the condition is false, even though Printer B’s port matches the condition. |
Match as |
The type of matching to use on the value. Choose between Text, Number, and Version. Choose the condition and enter the applicable value. IMPORTANT: The registry option does not work for data that spans multiple lines. |
10.(Conditional) Click the PDQ Inventory Collection Is A Member or Is Not A Member if you would like to ensure a target computer is a member or is not a member of a collection before running the package.
IMPORTANT: This requires both PDQ Inventory and PDQ Deploy in Enterprise mode. For the integration to work properly with Central Server, both products will need to be installed on the same console with both running in either Server mode or Client mode.
The PDQ Inventory Collection options are shown below:
Collection Options |
Description |
None |
Select to disable the collection condition (this is the default selection). |
Is A Member |
Select to ensure the target computer is a member of the selected collection before running the package. IMPORTANT: Using this condition does not prompt PDQ Inventory to do a scan of the collection at the time of the deployment. The membership of the selected collection is only as good as the last scan. |
Is Not A Member |
Select to ensure the target computer is not a member of the selected collection before running the package. IMPORTANT: Using this condition does not prompt PDQ Inventory to do a scan of the collection at the time of the deployment. The membership of the selected collection is only as good as the last scan. |
Collection |
Click Select Collection to browse your PDQ Inventory collections and select the collection to use. Click OK once the collection is selected. |
11.Click the Options tab.
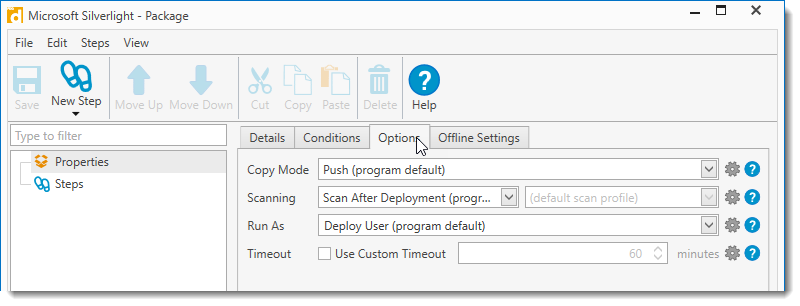 |
12.(Conditional) Select the Copy Mode to determine how package files are copied to target computers.
The options are:
•Push: Files are copied from the PDQ Deploy Console computer to target computers (default).
•Pull: Files are copied from a network share (via accessible UNC path). (Requires Enterprise mode)
You can use the Copy Mode default setting (Preferences > Performance) or override it here. For more information, see Copy Mode in Performance Preferences.
13.(Conditional) Select a PDQ Inventory scanning setting for the package. (Requires PDQ Inventory in Enterprise mode.)
Enabling the Scanning feature will initiate an Inventory scan to be executed on the target computers following the deployment. This is a great way to keep your inventory up-to-date.
The target computers must already be in PDQ Inventory with names or host names that match the names used in PDQ Deploy.
You can use the Scanning default setting (Preferences > Deployments) or override it here. For more information, see Scanning in Deployments Preferences.
14.(Conditional) Select a Run As setting. (Requires Enterprise mode to choose Deploy User (Interactive) or Logged on User.)
Selects how the Windows service "logs on" to the target computer after it is created and the how the package is executed. Deploy User is the recommended setting and should be used unless there is an explicit requirement to use another method. For detailed information about Run As settings, see Run As in Deployments Preferences.
15.(Optional) Set a custom timeout value.
Use the default value (60 minutes) or if you are creating a complicated package (for example, a package containing many nested packages), or you can increase the value here.
16.Click the Offline Settings tab.
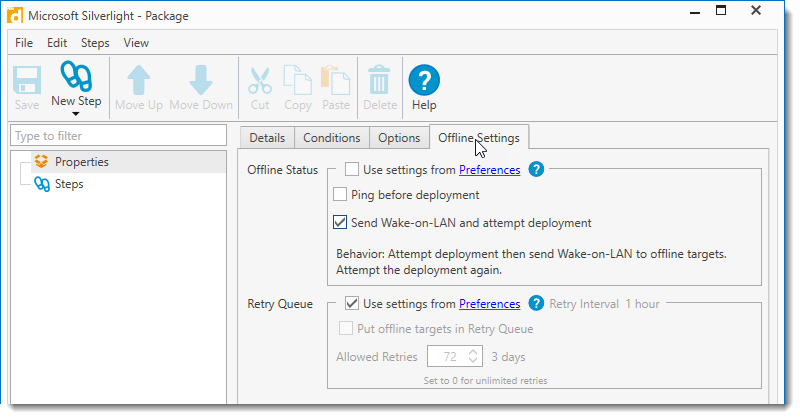 |
17.(Optional) You can use the Offline Status default settings from Preferences or override it for the package by doing the following:
a.Clear the Use settings from Preferences checkbox.
While there are only two options for offline computers, the following four behaviors are available:
•Uncheck both Ping before deployment and Send Wake-on-LAN and attempt deployment: This will attempt the deployment to all targets whether they are online or offline.
•Check only Ping before deployment: Do not attempt deployment: Target computers are pinged (pinging all addresses returned by DNS until one responds) to determine their online status. The deployment is only attempted on online computers.
•Check only Send Wake-on-LAN and attempt deployment: Attempts the deployment first, sends a Wake-on-LAN to any offline targets, then attempts a second deployment to those targets that come online. A third deployment is attempted after 5 minutes for any targets that remains offline.
•Check both Ping before deployment and Send Wake-on-LAN and attempt deployment: Prior to deploying, this will ping the targets (pinging all addresses returned by DNS until one responds) to determine offline status and then send a Wake-on-LAN to offline targets. The deployment is then attempted on all targets, after 5 minutes a second deployment is attempted on any targets that remain offline.
NOTE: Use of Send Wake-on-LAN and attempt deployment requires PDQ Deploy in Enterprise mode and PDQ Inventory. Furthermore, PDQ Inventory must have the MAC address of the target computers’ NICs.
You can edit the default Offline Status settings in Preferences > Deployments. For more information, see Deployments Preferences.
18.(Optional) You can use the Retry Queue default settings from Preferences or override it for the package by doing the following:
a.Clear the Use settings from Preferences checkbox.
b.To set a custom retry value for the package, select Put Offline Targets in Retry Queue, then specify the number of retry attempts.
To set unlimited retries set the value to 0.
You can edit the default Retry Queue settings in Preferences > Deployments. For more information, see Deployments Preferences.
19.Continue to Part 2: Install Step Properties.
Important: The package cannot be saved until a step has been added. It is advised once a step is added you periodically save changes. You can also close (and save) the package window, then continue later.
Part 2: Install Step Properties
When you create a new package, no steps are added automatically, however there is a page for Steps ![]() to be added. For details see Install Step Properties.
to be added. For details see Install Step Properties.
To configure the Install Step properties:
1.Click New Step > Install or Steps ![]() and select Install.
and select Install.
The step property tabs display:
•Details: Properties unique to the step type.
•Conditions: Criteria that must be met for the step to be processed.
•Options: Additional options for the step.
This part of the procedure is about the Install Step properties on the Details tab. To configure deployment properties, see Part 3: Conditions and Options.
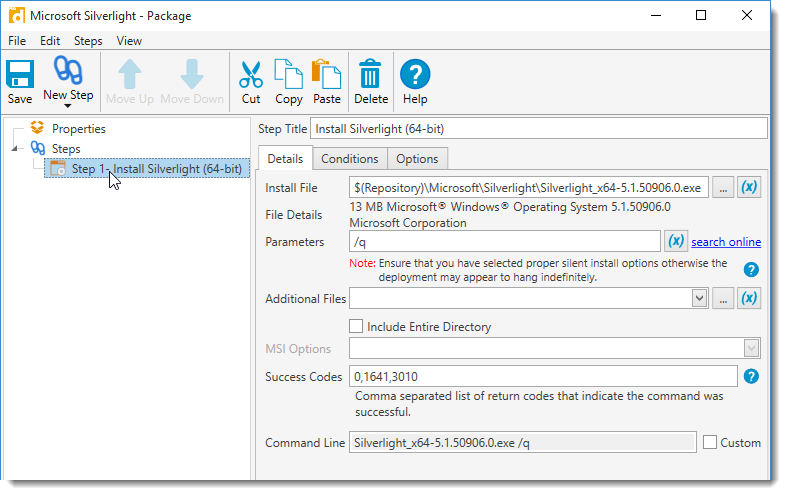
2.(Optional) Type a name for the step.
To clearly identify the step, use names that include the step type (for our example, Install Step), product name, version, and other important information such as architecture (for example, 32 or 64- bit). For additional naming guidance look at how steps are named in the Package Library.
3.Click the Browse for the main install file button ![]() , navigate to and select your primary install file (for this example, Silverlight_x64.exe), then click Open.
, navigate to and select your primary install file (for this example, Silverlight_x64.exe), then click Open.
You can store install files for the custom packages you create anywhere, but a good strategy is to put them in the same Repository where prebuilt packages downloaded from the Package Library are saved. $(Repository) is a system variable within PDQ Deploy, configured in Preferences > Repository.
NOTE: For consoles using the Central Server running in Client or Server Mode, all files used in a package must either be stored in the Server's repository or in a location that is accessible to the background user on the Server. To identify the repository location, click on Preferences > Repository. For details, see Repository Preferences.
For information about including additional files with the primary install file, see the table in step 4.
4.Add the additional information for the Install Step.
The following table reviews each option on the Details tab:
Property |
Details |
|
Install File |
Select the primary component of an install step, the installer file. All PDQ Deploy installs include one or more files with one of them being the primary file. IMPORTANT: If the application has more files than the setup file, be sure to select the Include Entire Directory option, listed below the Additional Files section. To include other files, such as configurations or dependent installs, use the Additional Files option. For more information on the types of installs files and their options, see Supported Install Files. |
|
File Details |
Shows details about the selected file such as its size, publisher, and version (if available). Mouse over the information for additional details. |
|
Parameters |
Additional parameters to include in the command line. Be sure to include any silent options here, if needed. For more information, see Silent Install Options. To assist with finding silent parameters, click search online. This launches a Google search for the install file that you have selected. |
|
Additional Files |
Select any additional files for the install that are not in the main install file folder or sub-directories, such as an MSI transform or an answer file. Unlike the Include Entire Directory option, files included here are placed in the same directory as the install file. Note that if all the additional files you need are already in the same folder as the main install file, it’s easier to use the Included Entire Directory option. |
|
|
Include Entire Directory |
Includes all files (and sub-directories) in the same folder as the main install file. Unlike Additional Files, this option maintains the directory structure (including all sub-directories). |
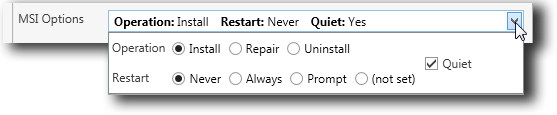
MSI Options |
For MSI, MSU, and MSP installs there are a number of options which can be passed to msiexec.exe as part of the install.
•Operation: Install is the most common option, but Repair and Uninstall are available if you need them. •Restart: Some installs require restarts to complete the installation (such as when files are in use). You can decide how restarts will be handled. The (not set) option does not include an option for restarting and will use the install’s default option or you can include another option on the command line (see below). •Quiet: Most often you will select this option (for more information, see Silent Install Options).There may be times when you want to use a different command line option than /qn or when the install doesn’t work properly with this option. For additional information, see Supported Install Files. |
|
Executable and batch installs typically report success with a return code of 0 (zero) but some also return success with other return codes. Usually these are warnings or other informational return codes that you can safely ignore. When creating an install you can provide a comma-separated list of return codes that will be considered a success. Any install that does not return one of these codes will be flagged as an error and the return code will display. For example, the default codes of 1641 and 3010 are MSI codes indicating that the installation was successful but a reboot was started (1641) or a reboot is required (3010). For a comprehensive list of Windows system error codes, see https://msdn.microsoft.com/en-us/library/windows/desktop/ms681381(v=vs.85).aspx. TIP: For information about troubleshooting MSI error codes, see Troubleshooting Microsoft Installer Errors. |
||
Command Line |
You can add additional command-line options here and see the final command-line that will be executed on the target computer. Select the Custom option to edit the command line directly. NOTE: It is generally unnecessary to customize the command line here. To add additional parameters or switches to a command you should use the Parameters field. Additionally, Enterprise mode users can create a separate Command Step. |
|
5.Save changes and continue to Part 3: Conditions and Options.
Part 3: Conditions and Options
Modifying Step Conditions or Options requires Enterprise mode.
Video: PDQ Live! Successful Deployments: How to Use Conditions and Options
(https://support.pdq.com/hc/en-us/articles/220537507)
To configure settings on the Conditions and Options tabs:
1.Click the Conditions tab.
2.Click the O/S Version list to select the Windows version(s) on which the step will run.
3.Click the O/S Architecture list to select whether the step will run on 32-bit, 64-bit, or both types of systems.
4.(For Install Step and PowerShell steps only) Click the PowerShell Version to select the PowerShell version or versions on which the step will run.
IMPORTANT: PowerShell version 1 is not supported in PDQ Deploy.
5.Click the Logged On State list to determine if the step runs based on whether or not the user is logged on to the target computer.
The options are shown in the following table:
Condition |
Description |
Always Run |
Run this step regardless of logged on state. |
Only run if no user is logged on |
Only run this step if no users are logged on. |
Only run if a user is logged on (including Locked and Disconnected) |
Only run this step if a user is logged on. This includes locked or disconnected sessions. |
For an example of how this option can be used, see Conditions for Message Steps.
6.(Conditional) Click the File Exists or Does Not Exist if you would like to ensure a file exists or does not exist on the target computer before running the step.
The File options are shown below:
Condition |
Description |
|
Use this option if you want to check for files on the target computer before running the step. For example, using the File Exists condition: Run only if Chrome.exe version is greater than 50 and product name equals Google Chrome.
|
||
|
None |
Select to disable the file condition. |
Exists |
Select to search for an existing file before running the step. |
|
Does Not Exist |
Select to ensure there is no such existing file before running the step. |
|
Directory |
Enter the directory where the file exists on the target computer. This directory can include environment variables. NOTE: Environment variables will be evaluated in the context of the Local System rather than the user. For example, the %TEMP% environment variable will evaluate to %SystemRoot%\TEMP instead of %USERPROFILE%\AppData\Local\Temp. |
|
Includes Subdirectories |
Check to include all the subdirectories of the directory above. |
|
The name of the file. IMPORTANT: The first filename that is matched will be used. For example, you set a Does Not Exist File condition for C:\Temp\Fancyfile with a version of 1.5. There are two instances of Fancyfile. The File Condition locates the first file, Fancyfile version 1.25, thereby returning true (does not exist) even though the other Fancyfile version 1.5 does in fact exist. |
||
File Version |
The version of the file from its header, if present. This filter can be equal to, less than, greater than, less than or equal to, greater than or equal to. If left blank, this will disable the file version. |
|
Product Version |
The version of the product from its header, if present. This filter can be equal to, less than, greater than, less than or equal to, greater than or equal to. If left blank, this will disable the file version. |
|
Description |
The description of the product from its header, if present. Can use the standard * and ? wildcards. |
|
Product Name |
The product name of the product from its header, if present. |
|
Company Name |
The company name of the product from its header, if present. |
|
7.(Conditional) Click the Registry Exists or Does Not Exist if you would like to ensure a registry entry exists or does not exist on the target computer before running the step.
The Registry options are shown below:
Condition |
Description |
|
Use this option if you want to check registry key on the target computer before running the step. IMPORTANT: The registry option does not work for data that spans multiple lines. For example, using the Registry Does Not Exist condition: Run only if UpdateDefault value of 0 does not exist.
|
||
|
None |
Select to disable the registry condition. |
Exists |
Select to search for an existing registry keys before running the step. |
|
Does Not Exist |
Select to ensure there is no such existing registry keys before running the step. |
|
Hive |
Choose between HKEY_LOCAL_MACHINE, HKEY_CLASSES_ROOT, and HKEY_USERS. |
|
Key |
Path of the key to look in. |
|
Include Sub Keys |
Looks also in all sub keys. |
|
Name of the value to match against. If the value name is left blank then the value of the key itself will be used. IMPORTANT: The first value name that is matched will be used. For example, using the Exists registry condition you search for printer IP addresses in HKLM\SYSTEM\CurrentControlSet\Control\Print\Printers with a 'port' value that contains the IP address of 192.168.0.100. Printer A is a software printer with a port in C:\ProgramData\PrintProgram\PortFile. Printer B has the port of 192.168.0.100. Because Printer A’s 'port' value is listed first, that is the value that is returned, hence the condition is false, even though Printer B’s port matches the condition. |
||
Match as |
The type of matching to use on the value. Choose between Text, Number, and Version. Choose the condition and enter the applicable value. IMPORTANT: The registry option does not work for data that spans multiple lines. |
|
8.(Conditional) Click the PDQ Inventory Collection Is A Member or Is Not A Member if you would like to ensure a target computer is a member or is not a member of a collection before running the step.
IMPORTANT: This requires both PDQ Inventory and PDQ Deploy in Enterprise mode. For the integration to work properly with Central Server, both products will need to be installed on the same console with both running in either Server mode or Client mode.
The PDQ Inventory Collection options are shown below:
Collection Options |
Description |
None |
Select to disable the collection condition (this is the default selection). |
Is A Member |
Select to ensure the target computer is a member of the selected collection before running the step. IMPORTANT: Using this condition does not prompt PDQ Inventory to do a scan of the collection at the time of the deployment. The membership of the selected collection is only as good as the last scan. |
Is Not A Member |
Select to ensure the target computer is not a member of the selected collection before running the step. IMPORTANT: Using this condition does not prompt PDQ Inventory to do a scan of the collection at the time of the deployment. The membership of the selected collection is only as good as the last scan. |
Collection |
Click Select Collection to browse your PDQ Inventory collections and select the collection to use. Click OK once the collection is selected. |
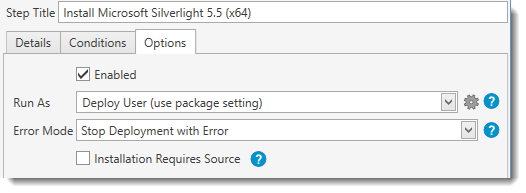
10.Click or clear the Enabled checkbox to determine whether or not the step runs.
The default setting is enabled.
11.(Conditional) Select a Run As setting.
Deploy User is the recommended setting and should be used unless there is an explicit requirement to use another method. For detailed information about Run As settings, see Run As in Deployments Preferences.
NOTE: The step level Run As option only applies to Install, Command, PowerShell, Nested Package, and File Copy steps.
12.Click the Error Mode list to select how the deployment responds if the step fails.
The Error Mode options are shown below:
Option |
Description |
Stop Deployment with Error |
If the step fails, stop deployment with returned error. |
Continue |
Continue deployment even if the step fails. |
Stop Deployment with Success |
If the step fails, stop deployment and report success. |
13.(Conditional) Click the Installation Requires Source checkbox if additional features, modifications, or repairs need to be made locally by the end user. Files will be automatically saved on the target computer to ADMIN$\AdminArsenal\PDQDeployRunner\Installers\{GUID}. The root directory is defined in Preference > Target Service.
| This is not enabled by default and is only available on the Install Step. |
Note: The Installation Requires Source feature is not intended as an installation source and should be used sparingly. Usage of this features should occur only for applications that specifically require a local copy/path of the original installation files in order to perform post-deployment programmatic modifications.
14.(Conditional) Save changes and do one of the following:
•If your package is complete, close the Package window.
If you are ready to create a deployment to test your new package, see Manually Deploying Packages.
•To add a Command step, continue to Part 4: Adding Command Steps.
•To add a step other than Install or Command, continue to Part 5: Adding Additional Steps.
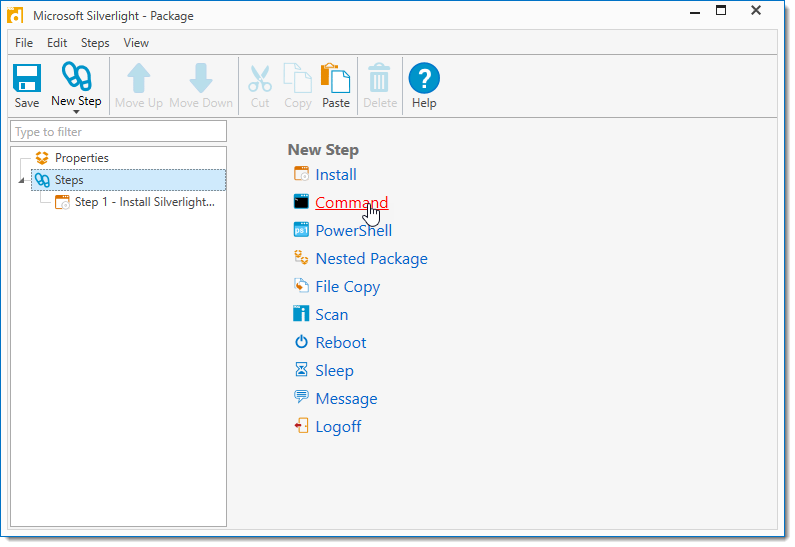
Part 4: Adding Command Steps
Command steps are used to execute commands silently on target computers (Enterprise mode required). For more details, see Command Step Properties.
To add a Command step to the package:
1.Click New Step > Command or Steps ![]() and select Command.
and select Command.
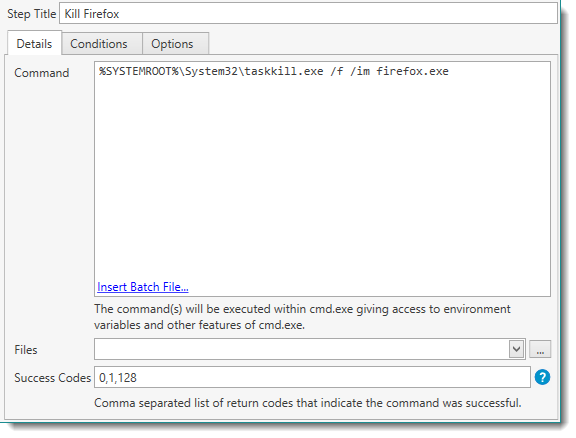
2.Type a name for the step.
To clearly identify the function of the Command step, use names that include an action (for example, Stop, Disable, or Remove), the product or process the step will act on, and other important information such as architecture (for example, 32 or 64-bit). For additional naming guidance look at how Command steps are named in the Package Library.
3.Type a command, then add the additional information for the Command Step.
Our example shows a command to kill Firefox using taskkill.exe.
The following table reviews each option on the Command step Details tab:
Property |
Details |
|
Command |
Enter the command you want executed on the target computer. The syntax for the command is the same as used when running commands in cmd.exe. You can use multiple commands in a command step—simply enter one command per line. The command will be executed on the target computer in the %SystemRoot%\ AdminArsenal\PDQDeployRunner\service-n\ directory. You can also specify commands and specific paths for files at other locations. If the command requires user interaction, set Run As (on the Options tab) to Logged On User or Deploy User (Interactive). For details about the Run As option, see Run As in Deployments Preferences. |
|
|
Insert Batch File |
This will attach a batch file to your package and call that file from within the Command Step. The included file will be listed in the Files section of the step. |
Additional Files |
Select any additional files you wish to include with the command. This is useful for running utilities that may not be installed on all target computers or for including configuration files. These files are copied into the %SystemRoot%\AdminArsenal\PDQDeployRunner\ directory on the target computer. |
|
The success or failure of the command is determined by its return code, referred to as ans %ERRORLEVEL% when running batch files. A command is considered a success if the command’s return code is listed in the successful Return Code column of the Deployment Status window. (For example, success code 128 is returned if firefox.exe is not running on the target. In this case, we want that counted as a success.) The default codes of 1641 and 3010 are MSI codes indicating that the installation was successful but a reboot was started (1641) or a reboot is required (3010). For a comprehensive list of Windows system error codes, see https://msdn.microsoft.com/en-us/library/windows/desktop/ms681381(v=vs.85).aspx. |
||
4.Specify the deployment properties on the Conditions and Options tabs.
For details, see Part 3: Conditions and Options.
5.(Conditional) Save changes and do one of the following:
•If your package is complete, close the Package window.
If you are ready to create a deployment to test your new package, see Manually Deploying Packages.
•To add a step other than Install or Command, continue to Part 5: Adding Additional Steps.
•To add an Install step, continue to Part 2: Install Step Properties.
Part 5: Adding Additional Steps
This section describes the additional step types that are available for building your packages. To add additional Install or Command steps, see Part 2: Install Step Properties or Part 4: Adding Command Steps.
To add additional steps to the package:
1.Click the New Step > Step Type or Steps ![]() and select one of the following step types:
and select one of the following step types:
Step |
Icon |
Description |
|
Installs software using one or more install files. A variety of install file types can be used. You can also include scripts which can perform tasks that may be required to support an install. For more information, see Supported Install Files. |
|
|
Executes commands on the target computer from within cmd.exe (Enterprise mode required). Remember that any remote command must run silently. If user input is required (for example, confirming Yes), the command will time out unless the Run As option is set to Deploy User (Interactive) or Logged on User. For more details, see Run As in Deployments Preferences. |
|
|
Executes PowerShell commands on the target computer from within PowerShell.exe (Enterprise mode required). Remember that any remote command must run silently. If user input is required (for example, confirming Yes), the command will time out unless the Run As option is set to Deploy User (Interactive) or Logged on User. For more details, see Run As in Deployments Preferences. IMPORTANT: PowerShell version 1 is not supported in PDQ Deploy |
|
|
Executes other packages from within a package. (Enterprise mode required.) |
|
|
Copies files or folders to target computers. (Enterprise mode required.) |
|
|
Initiates an inventory scan from PDQ Inventory to determine information on the target computers based on the scan profile selected. IMPORTANT: This requires both PDQ Inventory (version 16.1.0.0 or later) and PDQ Deploy in Enterprise modes. For the integration to work properly with Central Server, both products will need to be installed on the same console with both running in either Server mode or Client mode. |
|
|
Reboots the target computer and waits for it to come back online. (Enterprise mode required.) |
|
|
Pauses the deployment for a fixed number of seconds between steps. (Enterprise mode required.) |
|
|
Displays a message on the target computer using msg.exe. Messages may be acknowledged by users by clicking OK. (Enterprise mode required.) |
|
|
Logs off interactive logged on sessions. (Enterprise mode required.) |
2.Type a name for the step.
To clearly identify the function of the step, use names that include the step type, the function of the step, and other important information about the step. For additional naming guidance look at how steps are named in the Package Library.
3.Specify the step properties on the Details tab.
See the following topics for information about specific step type properties:
•Nested Package Step Properties
4.Specify the deployment properties on the Conditions and Options tabs.
For details, see Part 3: Conditions and Options.
5.(Optional) Rearrange the order of the steps by clicking and dragging the steps to the desired order.
6.(Conditional) Save changes and do one of the following:
•If your package is complete, close the Package window.
If you are ready to create a deployment to test your new package, see Manually Deploying Packages.
•To add an Install step, continue to Part 2: Install Step Properties.
•To add a Command step, continue to Part 4: Adding Command Steps.
•To add a step other than Install or Command, repeat Part 5: Adding Additional Steps.
© 2020 PDQ.com Corporation. All rights reserved.
PDQ.com is a trademark of PDQ.com Corporation. All other product and company names are the property of their respective owners.
Help Version: 19.1.15.0