Auto Deployment allows you to automatically deploy new versions of packages as they become available in the PDQ Deploy Package Library. (Enterprise mode required.)
The Auto Deployment approval policy determines when your auto deployment schedules will be automatically updated, unless you approve them manually, after Admin Arsenal releases updated packages in the Package Library. The default approval policy is set in Preferences but can be overridden at the package and schedule level.
VIDEO: Admin Arsenal Live! - Auto Deployment

(http://www.adminarsenal.com/pdq-deploy/videos#!admin-arsenal-live!---auto-deployment)
VIDEO: Adding Multiple Packages to an Auto Deployment
(http://www.adminarsenal.com/pdq-deploy/videos#!adding-multiple-packages-to-an-auto-deployment)
This topic includes the following sections:
•Default Auto Deployment Settings in Preferences
•Scheduling an Auto Deployment
Default Auto Deployment Settings in Preferences
The following settings define the default approval policy for new Auto Deployment packages.
To configure auto deployment settings in Preferences:
1.On the Main Console window, click File > Preferences or press Ctrl+Comma.
2.In the Preferences window, click Package Library.
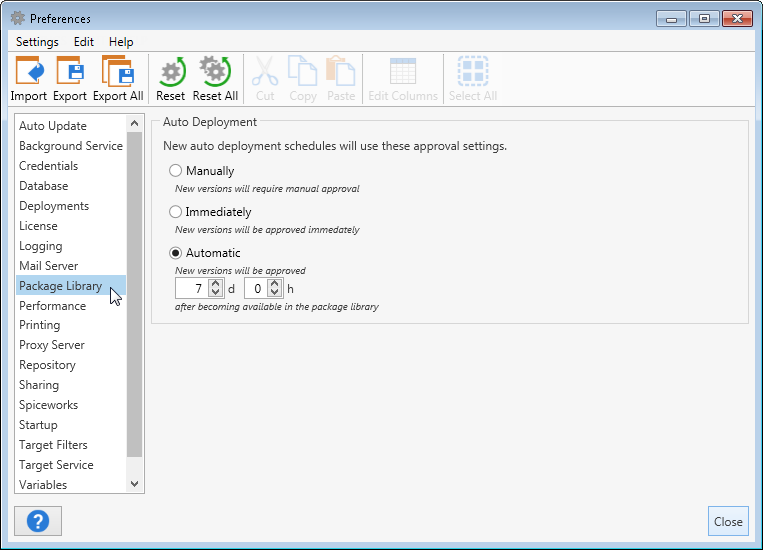
3.On the Package Library page, choose the default auto deployment policy settings.
Your policy settings will depend on your company’s best practices regarding testing and implementing software updates. The options are described in the following table:
Option |
Description |
Manually |
New package versions require manual approval before they are deployed. |
Immediately |
New package versions are immediately approved and are attached to their respective PDQ Deployment schedules. IMPORTANT: Although a package may be immediately approved, it is not actually deployed until its associated schedule runs. |
Automatic |
Sets the interval in days and hours until new package versions are automatically approved. This is enabled by default with a setting of 7 days. |
4.When you are finished, click Close.
NOTE: When you update the default approval policy, the new setting only affects new auto deployment schedules created after you make the change. Existing schedules use the previous default setting or the overrides set at the package or schedule level.
Scheduling an Auto Deployment
To create an auto deployment schedule:
1.On the Main Console window, click Package Library on the tree.
2.Browse the Package Library and select the package you want to auto deploy.
You can also select and include multiple packages in your auto deployment schedule. This might be for a batch of new or similar computers that need a set of applications installed or updated.
3.On the Package Library page, click Add Auto Deployment > Create New Schedule.
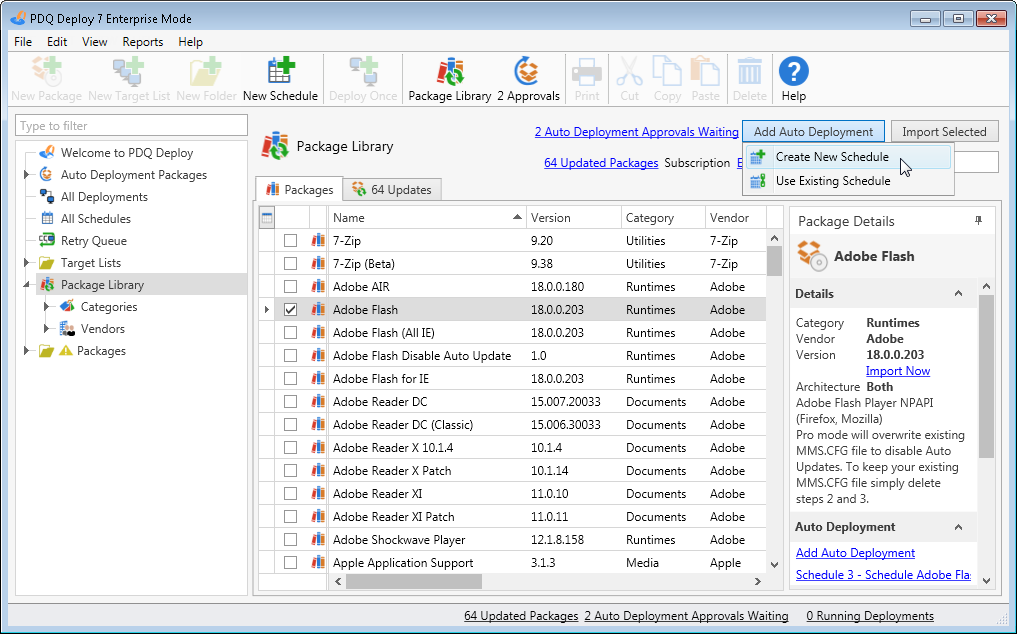
A new Schedule window opens on the Triggers tab.
NOTE: You can also add the selected package or packages to an existing schedule. Click Use Existing Schedule, select a schedule, then click OK. Edit the schedule as needed, then skip to step 11.
4.Type a schedule name.
Use a name that makes sense for the new schedule.
5.On the Triggers tab toolbar, click to select a Schedule Trigger, then define the schedule settings.
For details about configuring triggers, see Creating Scheduled Deployments, Part 2: Schedule Triggers and Settings.
6.On the Targets tab, select the target computers.
For details about selecting target computers or linking to collections, see Creating Scheduled Deployments, Part 3: Schedule Targets.
7.On the Options tab, configure the deployment settings.
For details about deployment settings, see Creating Scheduled Deployments, Part 4: Schedule Deployment Settings.
8.To see the package or packages attached to the schedule:
a.Click OK to create the schedule.
The Package tab does not appear in a new schedule until it is created and saved.
b.From the Schedule tab on the Package page, double-click the schedule to open it again, then click the Package tab.
You can rearrange or add and remove packages as needed.
NOTE: When you create an auto deployment from a package, only the install files are downloaded from the Package Library to your repository. The package itself is not added to your local package collection.
c.Click OK to save any additional changes.
NOTE: The Package Library refreshes every 2 hours and every time PDQ Deploy opens. You also can manually refresh the library on the Main Console window (click View > Refresh or press F5). When packages are updated in the Package Library, PDQ Deploy starts counting down (according to the approval policy) to the time when any auto deployment schedules they are attached to are automatically updated. PDQ Deploy displays auto deployment updates waiting to be approved in the status bar. For information about the Approval Policy, see the Package Library Auto Deployment Settings in Preferences or the approval overrides at the schedule level in step 9.
9.To override the default approval policy for the new schedule, select it (from the tree click Auto Deployment Packages > package name, then in the Package page click the Schedules tab > schedule), and do one of the following:
•To approve the updated package immediately, under Schedule Details > New version available, click Approve early.
•To modify the Approval Policy, under Schedule Details > Approval, click change. In the Approval Policy window, change the policy, then click OK.
NOTE: Remember that whenever a new package is approved, it still relies on the schedule to be deployed to your target computers. To override the scheduled deployment, see step 10.
10.(Optional) To run the deployment immediately rather than waiting for its scheduled deployment, on the tree select All Schedules > schedule name, then right-click and select Start Schedule > package (or All Attached Packages).
© 2015 Admin Arsenal, Inc. All rights reserved.
Admin Arsenal is a trademark of Admin Arsenal, Inc. All other product and company names are the property of their respective owners.
Help Version: 7.0.4.0