A PDQ Deploy Package contains the instructions and the files needed to silently install an application, run scripts and commands, or reboot target computers using PDQ Deploy. This section describes how to create and configure custom packages.
To create a Package, start on the Main Console window and click File > New Package or the ![]() New Package button (or press Ctrl+N). A new Package window opens—this is where you configure the package. For an introduction to the Package window, see Package Window.
New Package button (or press Ctrl+N). A new Package window opens—this is where you configure the package. For an introduction to the Package window, see Package Window.
An alternative to creating a new package from scratch is to base a new package on a prebuilt package downloaded from the package library. Duplicate and rename a package that is similar to the new package you need, then edit it to meet your requirements. Examining prebuilt packages is also a great way to learn how packages are constructed and configured. For information about duplicating and editing packages, see Managing Packages.
The creating a new package procedure includes the following parts:
•Part 2: Install Step Properties
•Part 3: Conditions and Options
•Part 5: Adding Additional Steps
VIDEO: Building Your Own Deployment Package

(http://www.adminarsenal.com/pdq-deploy/videos#!building-your-own-deployment-package)
VIDEO: How to Build Your Own Deployment Package
(http://www.adminarsenal.com/pdq-deploy/videos#!how-to-build-your-own-deployment-package)
Part 1: Package Properties
To create a new PDQ Deploy package:
1.On the PDQ Deploy Main Console window, click File > New Package (or press Ctrl+N) or click New Package![]() on the toolbar.
on the toolbar.
A new blank Package window opens with Package Properties selected and one empty Install step.
2.Type a name and version for the package.
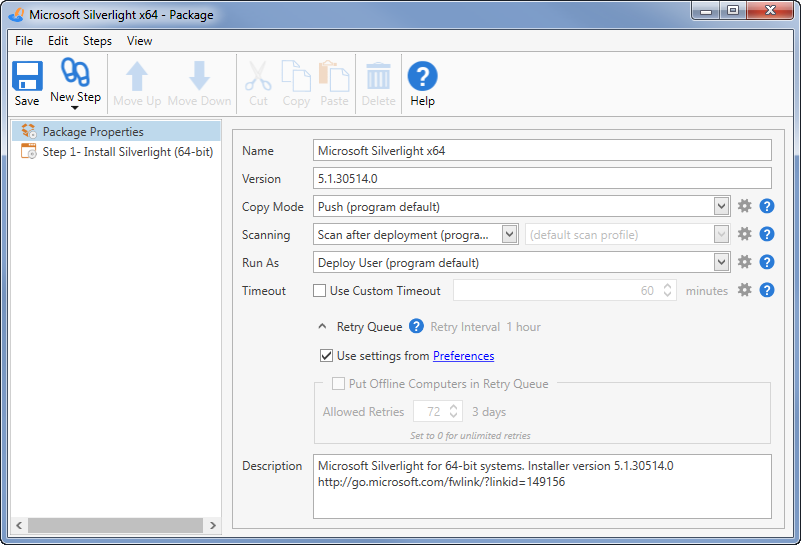
You are likely to create many packages so it’s important to name them clearly and consistently. We suggest using names that include the product, version, and other important information. For additional naming guidance, look at how packages are named in the Package Library.
NOTE: Generally you can include 64 and 32-bit applications in the same package. For the example used in this procedure, we are creating a simple custom package for the 64-bit version of Microsoft Silverlight only.
3.Click Save ![]() or press Ctrl+S.
or press Ctrl+S.
As you progress through the package configuration process you should periodically save changes. You can also close (and save) the package window, then continue later.
4.(Conditional) Select the Copy Mode to determine how package files are copied to target computers.
The options are:
•Push: Files are copied from the PDQ Deploy Console computer to target computers (default).
•Pull: Files are copied from a network share (via accessible UNC path).
You can use the Copy Mode default setting (Preferences > Performance) or override it here. For more information, see Copy Mode in Performance Preferences.
5.(Conditional) Select a PDQ Inventory scanning setting for the package. (Requires PDQ Inventory 3.1 or later in Pro or Enterprise mode.)
Enabling the Scanning feature will cause an Inventory scan to be executed on the target computers following the deployment. This is a great way to keep your inventory up-to-date.
The target computers must already be in PDQ Inventory with names or host names that match the names used in PDQ Deploy.
You can use the Scanning default setting (Preferences > Deployments) or override it here. For more information, see Scanning in Deployments Preferences.
6.(Conditional) Select a Run As setting. (Requires Pro or Enterprise mode to choose Deploy User (Interactive) or Logged on User.)
Choose the credentials used to execute the package steps on the target. Deploy User is the recommended setting and should be used unless there is an explicit requirement to use another method. For detailed information about Run As settings, see Run As in Credentials Preferences.
7.(Optional) Set a custom timeout value.
Use the default value (60 minutes) or if you are creating a complicated package (for example, a package containing many nested packages), or you can increase the value here.
8.(Optional) To set custom Retry Queue settings for the package, do the following:

a.Click the arrow ![]() to expand Retry Queue settings.
to expand Retry Queue settings.
b.Clear the Use settings from Preferences checkbox.
c.To set a custom retry value for the package, select Put Offline Computers in Retry Queue, then specify the number of retry attempts.
To set unlimited retries set the value to 0.
You can edit the default Allowed Retries settings, and several additional options, in Preferences > Deployments > Offline Settings. For more information, see Deployments Preferences.
9.(Optional) Include a description for the package.
Like the package name, it’s important to provide descriptions that clearly and consistently explain the purpose of the package. For additional guidance, look at the package descriptions of prebuilt packages in the Package Library.
10.Save changes and continue to Part 2: Install Step Properties.
Part 2: Install Step Properties
When you create a new package, a new blank Install Step is added automatically. For details see Install Step Properties.
To configure the Install Step properties:
1.In the step list, click Step 1.
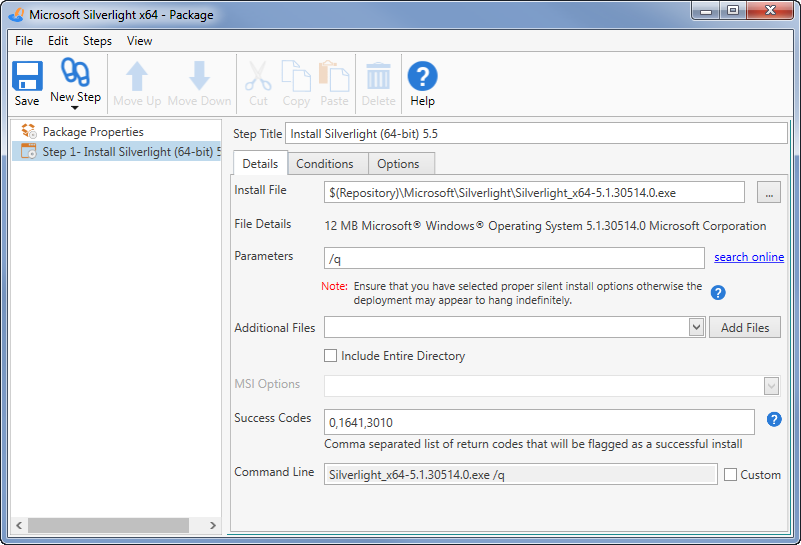
The step property tabs display:
•Details: Properties unique to the step type.
•Conditions: Criteria that must be met for the step to be processed.
•Options: Additional options for the step.
This part of the procedure is about the Install Step properties on the Details tab. To configure deployment properties, see Part 3: Conditions and Options.
2.(Optional) Type a name for the step.
To clearly identify the step, use names that include the step type (for our example, Install Step), product name, version, and other important information such as architecture (for example, 32 or 64- bit). For additional naming guidance look at how steps are named in the Package Library.
3.Click the Browse for the main install file button ![]() , navigate to and select your primary install file (for this example, Silverlight_x64.exe), then click Open.
, navigate to and select your primary install file (for this example, Silverlight_x64.exe), then click Open.
You can store install files for the custom packages you create anywhere, but a good strategy is to put them in the same Repository where prebuilt packages imported from the Package Library are saved.
NOTE: $(Repository) is a system variable within PDQ Deploy, configured in Preferences > Repository, that represents the location of install files. For details, see Repository Preferences.
For information about including additional files with the primary install file, see the table in step 4.
4.Add the additional information for the Install Step.
The following table reviews each option on the Details tab:
Property |
Details |
Install File |
Select the primary component of an install step, the installer file. All PDQ Deploy installs include one or more files with one of them being the primary file. IMPORTANT: If the application has more files than the setup file, be sure to select the Include Entire Directory option, listed below the Additional Files section. To include other files, such as configurations or dependent installs, use the Additional Files option. For more information on the types of installs files and their options, see Supported Install Files. |
File Details |
Shows details about the selected file such as its size, publisher, and version (if available). Mouse over the information for additional details. |
Parameters |
Additional parameters to include in the command line. Be sure to include any silent options here, if needed. For more information, see Silent Install Options. To assist with finding silent parameters, click search online. |
Additional Files |
Select any additional files for the install that are not in the main install file folder or sub-directories, such as an MSI transform or an answer file. Unlike the Include Entire Directory option, files included here are placed in the same directory as the install file. Note that if all the additional files you need are already in the same folder as the main install file, it’s easier to use the Included Entire Directory option. |
Include Entire Directory |
Includes all files (and sub-directories) in the same folder as the main install file. Unlike Additional Files, this option maintains the directory structure (including all sub-directories). |
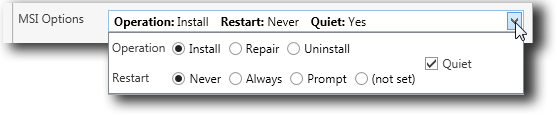
MSI Options |
For MSI, MSU, and MSP installs there are a number of options which can be passed to msiexec.exe as part of the install.
•Operation: Install is the most common option, but Repair and Uninstall are available if you need them. •Restart: Some installs require restarts to complete the installation (such as when files are in use). You can decide how restarts will be handled. The (not set) option does not include an option for restarting and will use the install’s default option or you can include another option on the command line (see below). •Quiet: Most often you will select this option (for more information, see Silent Install Options).There may be times when you want to use a different command line option than /qn or when the install doesn’t work properly with this option. For additional information, see Supported Install Files. |
Executable and batch installs typically report success with a return code of 0 (zero) but some also return success with other return codes. Usually these are warnings or other informational return codes that you can safely ignore. When creating an install you can provide a comma-separated list of return codes that will be considered a success. Any install that does not return one of these codes will be flagged as an error and the return code will display. For example, the default codes of 1641 and 3010 are MSI codes indicating that the installation was successful but a reboot was started (1641) or a reboot is required (3010). For a comprehensive list of Windows system error codes, see https://msdn.microsoft.com/en-us/library/windows/desktop/ms681381(v=vs.85).aspx. TIP: For information about troubleshooting MSI error codes, see Troubleshooting Microsoft Installer Errors. |
|
Command Line |
You can add additional command-line options here and see the final command-line that will be executed on the target computer. Select the Custom option to edit the command line directly. NOTE: It is generally unnecessary to customize the command line here. To add additional parameters or switches to a command you should use the Parameters field. |
5.Save changes and continue to Part 3: Conditions and Options.
Part 3: Conditions and Options
Modifying Step Conditions or Options requires Enterprise or Pro mode.
Video: Successful Deployments: How to Use Conditions and Options
To configure settings on the Conditions and Options tabs:
1.Click the Conditions tab.
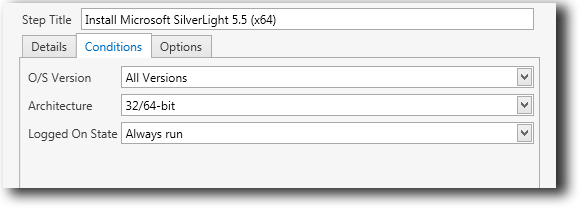
2.Click the O/S Version list to select the Windows versions that the step will run on.
3.Click the Architecture list to select whether the step will run on 32-bit, 64-bit, or both types of systems.
4.Click the Logged On State list to determine if the step runs based on whether or not the user is logged on to the target computer.
The options are shown in the following table:
Condition |
Description |
Always Run |
Run this step regardless of logged on state. |
Only if no user is logged on |
Only run this step if no users are logged on. |
Only if a user is logged on |
Only run this step if a user is logged on. |
For an example of how this option is can be used, see Conditions for Message Steps.
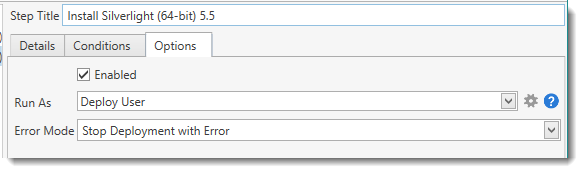
6.Click or clear the Enabled checkbox to determine whether or not the step runs.
Enabled is the default setting.
7.(Conditional) Select a Run As setting.
Deploy User is the recommended setting and should be used unless there is an explicit requirement to use another method. For detailed information about Run As settings, see Run As in Credentials Preferences.
NOTE: The step level Run As option only applies to Install, Command, File Copy, and Message steps.
8.Click the Error Mode list to select how the deployment responds if the step fails.
The Error Mode options are shown below:
Option |
Description |
Stop Deployment with Error |
If the step fails, stop deployment with returned error. |
Continue |
Continue deployment even if the step fails. |
Stop Deployment with Success |
If the step fails, stop deployment and report success. |
9.(Conditional) Save changes and do one of the following:
•If your package is complete, close the Package window.
If you are ready to create a deployment to test your new package, see Manually Deploying Packages.
•To add a Command step, continue to Part 4: Adding Command Steps.
•To add a step other than Install or Command, continue to Part 5: Adding Additional Steps.
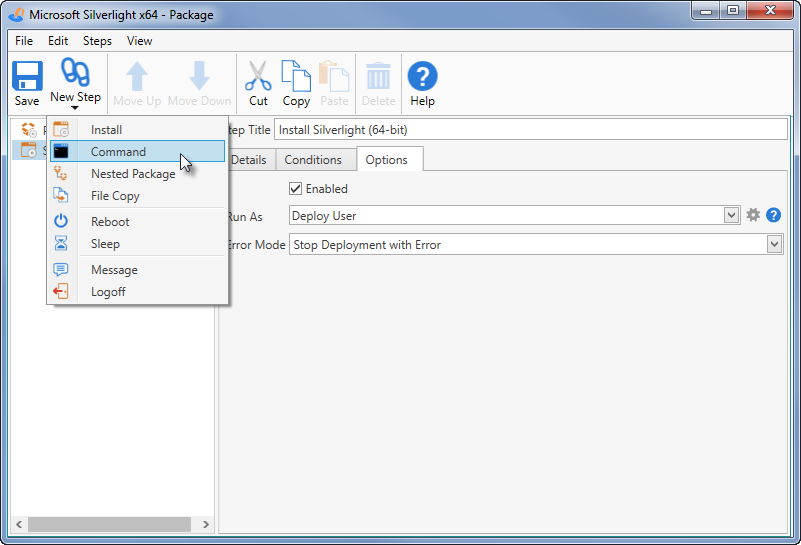
Part 4: Adding Command Steps
Command steps are used to execute commands silently on target computers (Pro or Enterprise mode required). For more details, see Command Step Properties.
To add a Command step to the package:
1.Click Steps > New Step > Command or New Step ![]() and select Command.
and select Command.
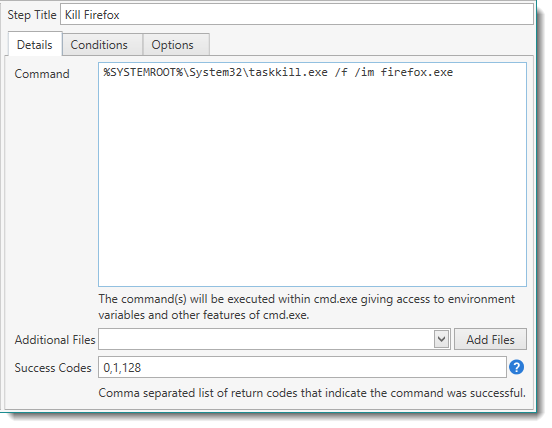
2.Type a name for the step.
To clearly identify the function of the Command step, use names that include an action (for example, Stop, Disable, or Remove), the product or process the step will act on, and other important information such as architecture (for example, 32 or 64-bit). For additional naming guidance look at how Command steps are named in the Package Library.
3.Type a command, then add the additional information for the Command Step.
Our example shows a command to kill Firefox using taskkill.exe.
The following table reviews each option on the Command step Details tab:
Property |
Details |
Command |
Enter the command you want executed on the target computer. The syntax for the command is the same as used when running commands in cmd.exe. You can use multiple commands in a command step—simply enter one command per line. The command will be executed on the target computer in the %SystemRoot%\ AdminArsenal\PDQDeployRunner\service-n\ directory. You can also specify commands and specific paths for files at other locations. If the command requires user interaction, set Run As (on the Options tab) to Logged On User or Deploy User (Interactive). For details about the Run As option, see Run As in Credentials Preferences. |
Additional Files |
Select any additional files you wish to include with the command. This is useful for running utilities that may not be installed on all computers or for including configuration files. These files are copied into the %SystemRoot%\AdminArsenal\PDQDeployRunner\ directory on the target computer. |
The success or failure of the command is determined by its return code, referred to as ans %ERRORLEVEL% when running batch files. A command is considered a success if the command’s return code is listed in the successful Return Code column of the Deployment Status window. (For example, success code 128 is returned if firefox.exe is not running on the target. In this case, we want that counted as a success.) The default codes of 1641 and 3010 are MSI codes indicating that the installation was successful but a reboot was started (1641) or a reboot is required (3010). For a comprehensive list of Windows system error codes, see https://msdn.microsoft.com/en-us/library/windows/desktop/ms681381(v=vs.85).aspx. |
4.Specify the deployment properties on the Conditions and Options tabs.
For details, see Part 3: Conditions and Options.
5.(Conditional) Save changes and do one of the following:
•If your package is complete, close the Package window.
If you are ready to create a deployment to test your new package, see Manually Deploying Packages.
•To add a step other than Install or Command, continue to Part 5: Adding Additional Steps.
•To add an Install step, continue to Part 2: Install Step Properties.
Part 5: Adding Additional Steps
This section describes the additional step types that are available for building your packages. To add additional Install or Command steps, see Part 2: Install Step Properties or Part 4: Adding Command Steps.
VIDEO: Multiple Steps in Deployment Packages
(http://support.adminarsenal.com/entries/97302857-Multiple-Steps-in-Deployment-Packages)
To add additional steps to the package:
1.Click the New Step ![]() button and select one of the following step types:
button and select one of the following step types:
Step |
Icon |
Description |
|
Installs software using one or more install files. A variety of install file types can be used. You can also include scripts which can perform tasks that may be required to support an install. For more information, see Supported Install Files. |
|
|
Executes commands on the target computer from within cmd.exe. (Pro or Enterprise mode required.) Remember that any remote command must run silently. If user input is required (for example, confirming Yes), the command will time out unless the Run As option is set to Deploy User (Interactive) or Logged on User. For more details, see Run As in Credentials Preferences. |
|
|
Executes other packages from within a package. (Pro or Enterprise mode required.) |
|
|
Copies files or folders to target computers. (Pro or Enterprise mode required.) |
|
|
Reboots the target computer and waits for it to come back online. (Pro or Enterprise mode required.) |
|
|
Pauses the deployment for a fixed number of seconds between steps. (Pro or Enterprise mode required.) |
|
|
Displays a message on the target computer using msg.exe. Messages may be acknowledged by users by clicking OK. (Pro or Enterprise mode required.) |
|
|
Logs off interactive logged on sessions. (Pro or Enterprise mode required.) |
2.Type a name for the step.
To clearly identify the function of the step, use names that include the step type, the function of the step, and other important information about the step. For additional naming guidance look at how steps are named in the Package Library.
3.Specify the step properties on the Details tab.
See the following topics for information about specific step type properties:
•Nested Package Step Properties
4.Specify the deployment properties on the Conditions and Options tabs.
For details, see Part 3: Conditions and Options.
5.(Conditional) Save changes and do one of the following:
•If your package is complete, close the Package window.
If you are ready to create a deployment to test your new package, see Manually Deploying Packages.
•To add an Install step, continue to Part 2: Install Step Properties.
•To add a Command step, continue to Part 4: Adding Command Steps.
•To add a step other than Install or Command, repeat Part 5: Adding Additional Steps.
© 2016 Admin Arsenal, Inc. All rights reserved.
Admin Arsenal is a trademark of Admin Arsenal, Inc. All other product and company names are the property of their respective owners.
Help Version: 8.1.0.0