PDQ Inventory comes installed with a predefined set of tools with additional tools available in the Tools Library. Some tools are preconfigured to work in your environment out of the box, while other tools must be configured within PDQ Inventory, on target computers, or both before being available for use. This chapter covers the default tools included with PDQ Inventory and their configurations. Some tools, such as Remote Desktop and Remote Assistance, may require certain Group Policy settings.
In addition to the tools listed below and those available in the Tools Library, you can create your own tools. For more details about creating your own tools, see Creating a New Tool.
To use the tools listed below, select a computer or collection, click Tools on the main console toolbar (or click the Tools menu) and select the appropriate tool. For details about using tools, see Launching a Tool.
This section contains the following topics:
•Default Tools Descriptions and Configurations
Default Tools
The following table lists the default admin tools included with PDQ Inventory. Some command line equivalent examples below assume ComputerName for the name of a remote computer.
Item |
Icon |
Description |
|
Opens the Microsoft Event Viewer and loads the target computer. Equivalent to running eventvwr.exe ComputerName on the local computer. |
|
|
Opens the Microsoft Computer Management Console. Equivalent to running %SYSTEMROOT%\System32\mmc.exe compmgmt.msc /computer:ComputerName on the local computer |
|
|
Opens the Select PDQ Deploy Packages window within PDQ Deploy to initiate a deployment on the selected PDQ Inventory computer(s) or collection(s). (PDQ Deploy must be installed on the console machine.) |
|
|
Opens the Reboot/Shutdown window for the selected computer(s) or collection(s). Equivalent to running shutdown /r /t n or shutdown /s /t n on the local computer. |
|
|
Opens the Windows Remote Assistance window. Remote assistance must be enabled on the remote computer. |
|
|
Opens the Remote Command window for the selected computer(s) or collection(s). |
|
|
Initiates a Remote Desktop session on the remote computer. Equivalent to running %SYSTEMROOT%\system32\mstsc.exe /v:ComputerName:3389 |
|
|
Opens the VNC remote control viewer. (Requires that VNC Viewer is installed on the console machine and that VNC Server is installed and configured on the remote computer) |
|
|
Opens the Wake-on-LAN window for the selected computer(s) or collection(s) and starts sending WOL packets to all machines listed in the window. |
|
|
Opens the ADMIN$ share on the remote computer. Equivalent to running explorer.exe "\\ComputerName\ADMIN$' on the computer. (Pro mode required to use this tool) |
Default Tools Descriptions and Configurations
Event Viewer
Connects to the remote computer’s Event Viewer in order to view the logged information as though directly connected to the machine. Remote information is shown locally through the PDQ Inventory console’s Event Viewer interface.
Configuration: File and Print Sharing must be enabled on the remote computer.
Manage with MMC
Allows you to manage the remote computer via the Microsoft Management Console (MMC) console. The MMC console allows you to load a number of management snap-ins that can be used to configure and manage a remote computer. The MMC console is loaded locally on the PDQ Inventory console. This particular tool loads the compmgmt.msc snap-in.
Configuration: File and Print Sharing must be enabled on the remote computer.
PDQ Deploy
Opens the Select PDQ Deploy Packages window (and will also start PDQ Deploy if not already started), which allows you to deploy a package to one or multiple computers or to one or multiple collections.
From the Select PDQ Deploy Packages window, select the package or packages (Shift+Click or Ctrl+Click) you wish to deploy, use the ![]() or
or ![]() to add and remove packages from selected packages list, and click OK to deploy the package. You can also type part of a name of a package in the Type to filter box to limit the choice of packages. If you do not wish to deploy a package, click Cancel.
to add and remove packages from selected packages list, and click OK to deploy the package. You can also type part of a name of a package in the Type to filter box to limit the choice of packages. If you do not wish to deploy a package, click Cancel.
Configuration: Requires PDQ Deploy on the console computer.
Reboot/Shutdown
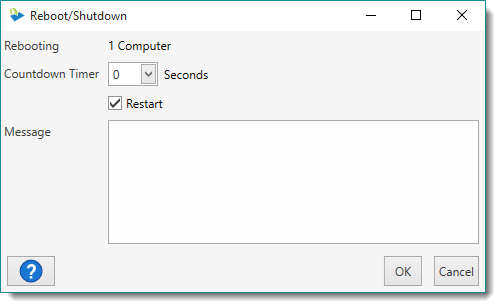
Opens the Reboot/Shutdown window. The Reboot/Shutdown tool and corresponding window allows you to reboot or shutdown one or multiple computers or the computers in one or multiple collections. Once the appropriate settings have been made, click OK to initiate the reboot/shutdown or click Cancel to abort the reboot/shutdown.
Item |
Description |
|
Rebooting |
The number of computers being targeted by the Reboot/Shutdown command. |
|
Countdown Timer |
The amount of time from the execution of the tool to the reboot or shutdown of the target computer(s). (Default is 0 seconds). |
|
|
Restart |
Check by default, which will reboot the computer. To shutdown the computer, uncheck the checkbox. |
Message |
A text field that allows you to send a message (using msg.exe) to all targeted computers and their corresponding users notifying them of the reboot/shutdown. Countdown timer must be greater than 0. |
|
Configuration: Security Policy "Force shutdown from a remote system" must be granted to Administrators.
Remote Assist
Opens the Windows Remote Assistance Window. This window allows you to initiate a Remote Assistance session on a single computer.
Configuration: Remote Assistance must be enabled on the target computer (sysdm.cpl > Remote tab or from a GPO).
Remote Command
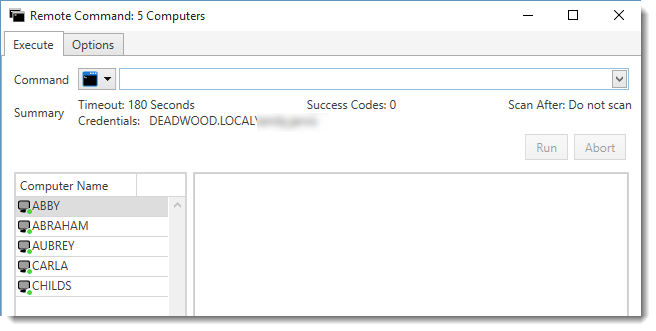
Opens the Remote Command: [target(s)] window, which allows you to run a remote command on one or multiple computers or to one or multiple collections. Remote commands run remotely on the selected targets. The results can then be exported into a .txt file.
Item |
Description |
||
Execute tab |
|
||
Command |
The command to run on the target computers. This is equivalent to what would be run from the Windows command or PowerShell. PDQ Inventory saves the command history of each command run against any computers. You can select the drop-down to choose a previously run command, delete individual commands, or select Clear Command History to clear the entire history. |
||
|
Select to use Command from within cmd.exe to execute the remote commands on the target computers |
||
Select to use PowerShell from within PowerShell.exe to execute remote commands on the target computers NOTE: Pro or Enterprise mode is required. |
|||
Summary |
Displays the following selections as they are made from the Options tab; Timeout, Success Codes, Scan After, Credentials, and Wake-on-LAN. |
||
|
Run |
Initiates the command on the selected target computer(s). |
|
Abort |
Aborts the command currently running. |
||
Computer Name (lower left-hand box) |
The list of computers against which the command will be initiated. This is not an editable, however, this list of names can be sorted. |
||
Error (hidden by default) |
Displays any error per computer. To show, hide, and move columns, click the Customize this grid button |
||
Is Running (hidden by default) |
Displays the computers that are currently running the remote command. To show, hide, and move columns, click the Customize this grid button |
||
Results box (lower right-hand box) |
The results of the command upon its completion. This can include information directly from the output of the command, a success code, or an error code. If the command was run against more than one computer, clicking on the computer name will show the result of the command on that computer. |
||
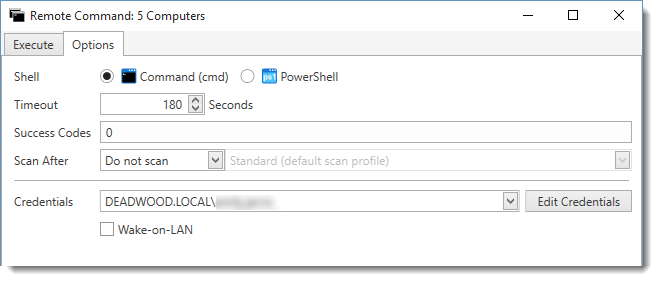
Options tab |
|
||
|
Shell |
|
|
|
|
Select to use Command from within cmd.exe to execute the remote commands on the target computers |
|
|
Select to use PowerShell from within PowerShell.exe to execute remote commands on the target computers NOTE: Pro or Enterprise mode is required. |
||
Timeout |
The length of time to run the command before it is automatically aborted (default is 180 seconds). |
||
Success Codes |
By default, 0 is selected, which means the command was successful. You can provide additional success codes in a comma-separated list. NOTE: Pro or Enterprise mode is required. |
||
Scan After |
Initiates an inventory scan after the remote command to identify the full inventory on each workstation. Scan after attempt to scan target computers even if the remote command fails. You may choose which Scan Profile to use. The default Scan Profile is defined in Options > Scan Profiles. You can choose to scan with any Scan Profile that has been configured. It is common to use either the Standard or Applications scan profiles. |
||
Credentials |
The credentials that will be used for the listed computer(s). The user must be a local administrator on the target computer(s). |
||
Edit Credentials |
Click to edit the existing credentials or add a new set of administrator credentials. |
||
Initiates a distributed Wake-on-LAN (WOL) event on all listed computers prior to running the remote command. NOTE: Pro or Enterprise mode is required for a distributed Wake-on-LAN (WOL). |
|||
Export |
Export the results from the selected computer(s) into a .txt file. |
||
Configuration: The Remote Command tool will accept Windows System Environment variables (for example, %PROGRAMFILES%, %WINDIR%, %SYSTEMDRIVE%, etc.).
For a demonstration of the Remote Command window in PDQ Inventory 10, see the following video.
Video: Using the Remote Command Window in PDQ Inventory

Remote Desktop
Opens up the Windows Remote Desktop Connection window and initiates a login/login prompt based on either saved credentials or the existing credentials of the PDQ Inventory admin logged into the PDQ Inventory console.
Configuration: RDP ports (TCP & UDP port 3389) must be allowed through Windows firewall and, in certain cases, users will need to be added to the Remote Desktop Users group. For information on configuring the Remote Desktop preferences, please see Remote Control.
VNC
Opens up the remote VNC remote connection on a remote computer.
Configuration: a VNC product (for example, TightVNC) must be installed on both the console and the target machine. Additionally, the viewer file must be installed on the PDQ Inventory machine. If no viewer file is found, PDQ Inventory will open the Remote Control option in Preferences (File > Preferences > Remote Control). For information on configuring the VNC preferences, please see Remote Control.
Wake
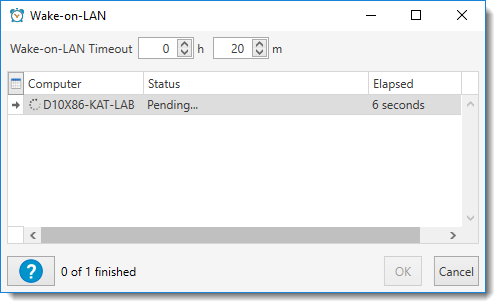
Opens the Wake-on-LAN window and immediately initiates a WOL event on all listed machines. WOL can be initiated on a single computer, many computers, a single collection, or multiple collections. Click Cancel to abort the WOL event(s). Click OK once all machines have successfully been started or WOL can no longer run.
NOTE: While Wake-on-LAN is available in free mode, Pro or Enterprise mode is required for distributed Wake-on-LAN. Distributed WOL is used to initiate WOL events across subnets and VLANs, bypassing border devices that normally block WOL packets.
Item |
Description |
Wake-on-LAN Timeout |
Specifies the amount of time the Wake-on-LAN will attempt before timing out. The default is 20 minutes. |
Computer |
List of the computer(s) receiving WOL packets. You can open the computer window directly by right-clicking the computer name and selecting Open (or Ctrl+O). |
Status |
The status of WOL event (pending, waking, the number of wake attempts, errors, etc.). |
Elapsed |
The total time elapsed from when the WOL event was initiated until stopped. |
Configuration: Wake-on-LAN capability must be enabled in the BIOS/UEFI and Network Interface Card on target computers.
For a demonstration of Wake-on-LAN, see the following video.
Video: Wake-on-LAN in PDQ Inventory and PDQ Deploy
Opens the ADMIN$ share on the remote computer. This is useful for testing to ensure that File and Printer Sharing is enabled. This is also useful if it is required to access the %SYSTEMROOT% of the remote machine. (Pro mode is required to use this tool).
Configuration: File and Print Sharing must be enabled on the remote computer.
© 2017 PDQ.com Corporation. All rights reserved.
PDQ.com is a trademark of PDQ.com Corporation. All other product and company names are the property of their respective owners.
Help Version: 14.1.0.0