Dynamic collections contain computers that match a set of filters. The membership of these collections are dynamically updated as inventory or filters change.
Dynamic collections are created and edited in the Dynamic Collection window. This window contains the collection details and the Filter Editor for setting the filtering options. You can also edit some aspects of dynamic collections on the main console.
For information about managing dynamic collections, see Managing Collections.
This section includes the following topics:
•Creating a Dynamic Collection
Creating a Dynamic Collection
This procedure includes the following parts:
•Part 1: Adding Dynamic Collection Details
•Part 2: Configuring Collection Filters
Part 1: Adding Dynamic Collection Details
To create a new dynamic collection:
1.On the main console toolbar, click New Dynamic Collection ![]() (or Collection > New Dynamic Collection or press Ctrl+N).
(or Collection > New Dynamic Collection or press Ctrl+N).
A new Dynamic Collection window opens.
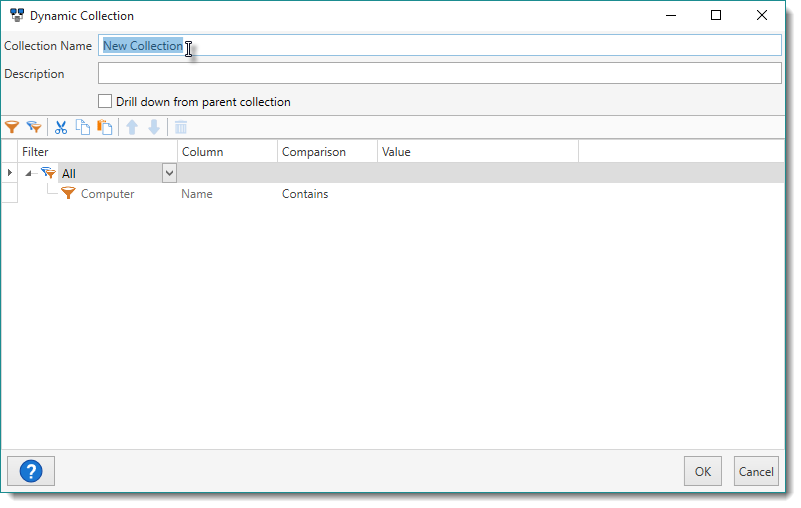
2.Type a name for the collection.
Use a name that explains the purpose of the collection.
3.(Optional) Include a description for the collection.
Like the name, it’s important to provide a description that clearly explains the purpose of the collection. For additional guidance, look at the descriptions of the prebuilt collections.
4.(Optional) If you are creating a drill down collection, click Drill down from parent collection.
A drill down collection is a subcollection (nested inside another collection) that is dependent upon the parent collection. Its filters will only evaluate the members of its parent collection and not all computers in the database. Drill down collections will not run the parent's filters, they will only process their own filters against member computers of the parent collection. For more details, see Drill Down Collections.
5.Continue to Part 2: Configuring Collection Filters to configure the filters for the collection.
Part 2: Configuring Collection Filters
This part of the procedure contains links throughout to relevant content in the Filter Editor section.
NOTE: By default, a new dynamic collection includes a top level group filter (that cannot be deleted) and one value filter.
To configure the dynamic collection filters:
1.To set the top group filter ![]() rule, click the Group Filter list and select a rule.
rule, click the Group Filter list and select a rule.
Choose a rule from the following options:
Rule |
Description |
All |
Items will only be included if all filters in the group (including any/all nested groups) are true. This is similar to using the AND operator in SQL. |
Any |
Items will only be included if any one (or more) of the filters in the group are true (including any nested groups). This is similar to using the OR operator in SQL. |
Not All |
Items will only be included if any one (or more) of the filters in the group are false (includes any nested groups). |
Not Any |
Items will only be included if all filters in the group (including any/all nested groups) are false. |
2.(Optional) To add additional group filters, do the following:
a.On the toolbar, click Add Group Filter ![]() .
.
The new group filter appears below the last item in the list.
b.(Conditional) Click the Move Up![]() or Move Down
or Move Down![]() arrows to change the position and nesting of the filter.
arrows to change the position and nesting of the filter.
For details, see Arranging Group and Value Filters.
c.Click the Group Filter list and select a rule.
3.To configure a value filter ![]() , do the following:
, do the following:
a.Click the Filter list and select a filter.
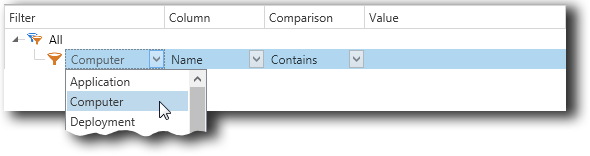
The filter represents the data category the collection filters against. In the Filter drop-down, you can choose from pages and other areas of the Computer window or even members of a collection. For details, see Filter.
b.Click the Column list and select a data column.
The column represents the property of a computer to compare against the value. In the Column drop-down, you can choose from the columns/fields that are available based on the selected Filter. For details, see Column.
c.Click the Comparison list and select a comparison.
The comparison is how the column is compared to the value. For details, see Comparison.
d.(Conditional) Click the Value field or list and enter or select a value to compare the column against.
The value type depends on the comparison selected. For details, see Value.
4.(Optional) To add additional value filters, do the following:
a.On the toolbar, click Add Value Filter ![]() .
.
The new value filter appears in the list.
b.(Conditional) Click the Move Up![]() or Move Down
or Move Down![]() arrows to change the position and nesting of the filter.
arrows to change the position and nesting of the filter.
For details, see Arranging Group and Value Filters.
c.Go to step 3 and configure the new filter.
5.When you are finished configuring the collection, click OK.
The new dynamic collection is added to the main console tree. If you selected another dynamic collection before creating a new one, it will be nested in the selected collection. You can move the collection to a different part of the tree by clicking the collection and dragging to a new location.
IMPORTANT: If the Drill down from parent collection is checked and the subcollection is moved away from its original parent collection, the subcollection will only filter from the members of its new parent collection providing for different results. If the collection is moved so it has no parent collection, the All Computers collection becomes the default parent.
6.View the results of the new collection on the collection page.
The members of the new collection appear in the list on the collection page.
NOTE: If you don't get the results you expect, or if PDQ Inventory reports an error (above the list), open the collection and verify that your filters are correct. The error message should provide a good idea of what the problem is. You can also click the Diagnose link to open the More Info window to view additional information and support links about the collection error. Repeat as needed.
For information about editing or managing dynamic collections, see Editing Dynamic Collections or Managing Collections.
Editing Dynamic Collections
Dynamic collections can be edited in the Dynamic Collection window and managed on the main console. You can also edit some aspects of dynamic collections on the main console.
For additional information about managing dynamic collections, see Managing Collections.
To edit a dynamic collection in the Dynamic Collection window:
1.On the main console window tree, select a dynamic collection ![]() .
.
2.Double-click the collection name in the tree (or click Collection > Edit Collection or press Ctrl+Shift+O or click Edit ![]() on the Collection page).
on the Collection page).
3.To edit the collection in the Dynamic Collection window, see the following table for a list of tasks and details:
Task |
Details |
Change the Name or Description |
Edit the name or description. |
Add or Edit a Group Filter |
To add a group filter: 1.On the toolbar, click Add Group Filter The new group filter appears below the last item in the list. 2.(Conditional) Click the Move Up For details, see Arranging Group and Value Filters. 3.To set or edit the group filter rule, click the Group Filter list and select a rule. For details, see Part 2: Dynamic Collection Filters. |
Add a Value Filter |
To add a value filter: 1.On the toolbar, click Add Value Filter The new filter appears in the list. 2.(Conditional) Click the Move Up For details, see Arranging Group and Value Filters. |
Edit a Value Filter |
To edit a filter do one or more of the following: •Click the Filter, Column, or Comparison list and select a new option. Depending on what you change, edit subsequent options as needed. •Click the Value field or list and enter or select a new value. |
4.When you finish editing, click OK to save changes and close the collection.
To edit or manage a dynamic collection on the main console:
1.See the following table for a list of tasks and details:
Task |
Details |
Change the Name |
Select a collection in the tree, right-click it and select Rename (or press F2), then edit the name. |
Delete a Collection |
To delete a dynamic collection, select a collection in the tree, click Delete |
Manage Collections |
You can move collections on the tree or nest them in other collections. For details, see Managing Collections. |
© 2018 PDQ.com Corporation. All rights reserved.
PDQ.com is a trademark of PDQ.com Corporation. All other product and company names are the property of their respective owners.
Help Version: 16.2.0.0