Scan profiles are created and edited in the Scan Profile window found in the Options menu. Scan profiles can be scheduled to run on a regular basis and target specific collections.
The new scan profile procedure includes the following parts:
•Part 1: Adding Scan Profile Details
•Part 2: Scheduling Automatic Scanning (Optional)
•Part 3: Linking Specific Collections for Schedules (Optional)
For a demonstration of scheduling a scan, see the following video.
Video: Scheduling Scans in PDQ Inventory

Scheduling Scans in PDQ Inventory
(https://youtu.be/sHzbDY9uQ50)
Part 1: Adding Scan Profile Details
To create a new scan profile:
1.On the Main Console window, click Options > Scan Profiles, then click New.
A New Scan Profile window opens on the Details tab.
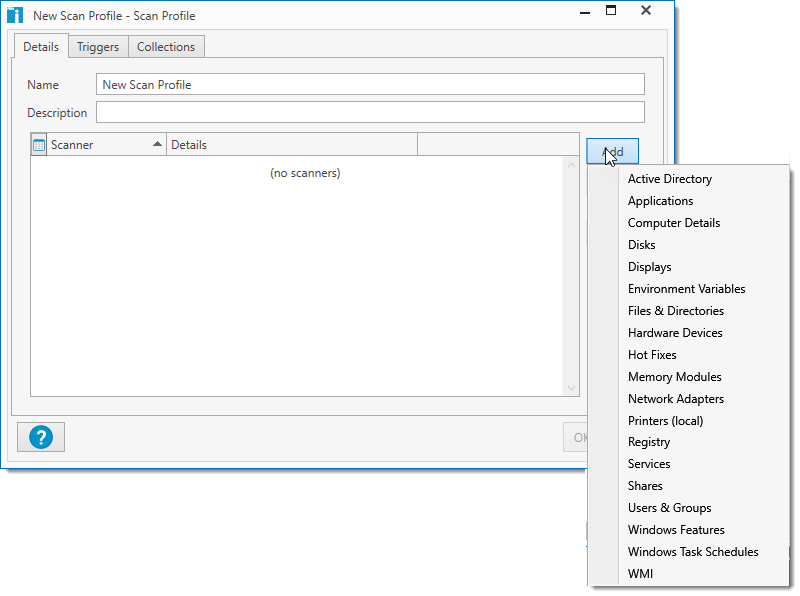
2.Type a name for the scan profile.
Use a name that makes sense for its purpose.
3.(Optional) Include a description for the scan profile.
Like the name, it’s important to provide a description that clearly explains the purpose of the scan profile. For additional guidance, look at the descriptions of the prebuilt scan profiles.
4.To add a scanner to the profile, click Add and select one of the following scanner types. (For details about any scanner, click a link below.)
•WMI |
The Files & Directories, Registry, and WMI scanners are configurable. For configuration details, see File Scanner Settings, Registry Scanner Settings, WMI Scanner Settings.
NOTE: Multiple WMI Scanners can be added to a single scan profile, but only one WMI scanner can be viewed at a time on the WMI Scanner page of the Computer window.
5.(Optional) To schedule the new scan profile for automatic scanning, continue to Part 2: Scheduling Automatic Scanning.
Part 2: Scheduling Automatic Scanning
To select a scan schedule type and configure schedule triggers:
1.On the Triggers tab, click a Trigger Type, then define the scan schedule settings.
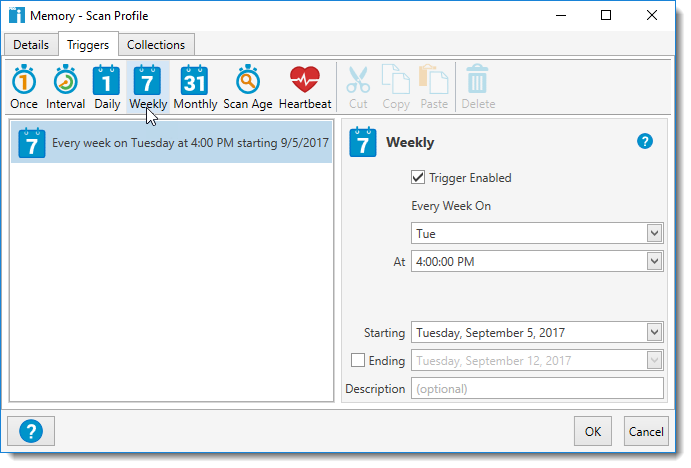
A scan profile can include one or more triggers. Be careful of creating conflicts when setting frequencies or using multiple triggers. If triggers overlap, only one scan will start. For example, having two triggers (one for every Monday at noon and one for every day at noon) will not start two scans every Monday. For additional tips on scheduling scans, see the table below.
The following table provides information on the scan trigger types and settings available on the Triggers tab.
Trigger |
Icon |
Details |
|
Runs once in the future. •Trigger Enabled: Enables the scan trigger for use (selected by default). •Trigger On: Select a one-time scan date. •At: Time the scan will run. •Description: (Optional) Description of the trigger. |
|
|
Runs (and repeats) at a set time interval. •Trigger Enabled: Enables the scan trigger for use (selected by default). •Every: Select scan interval by day, hour, and minute. •Starting: Select first scan date. •At: Time the scan will run. •Ending: (Optional) Date the scan ends. Select to enable the end date. •At: (Optional) Time the scan will end. •Description: (Optional) Description of the trigger. |
|
|
Runs every day at the same time. •Trigger Enabled: Enables the scan trigger for use (selected by default). •Every Day At: •Time the scan will run. •Starting: Date that the scan starts. •Ending: (Optional) Date the scan ends. Select to enable the end date. •Description: (Optional) Description of the trigger. |
|
|
Runs every week at the same time on selected days of the week. •Trigger Enabled: Enables the scan trigger for use (selected by default). •Every Week On: •Day (or days) that the scan runs. •At: Time the scan runs. •Starting: Date the scan starts. •Ending: (Optional) Date the scan ends. Select to enable the end date. •Description: (Optional) Description of the trigger. |
|
|
Runs every month at the same time on selected days. •Trigger Enabled: Enables the scan trigger for use (selected by default). •Every Month •Day of the Month: The actual day (or days) of the month (for example, 1, 12, 23, etc.). If you select the 29th, 30th, or 31st of the month, the scan won't run in months without those days. Select Last to always run the scan on the last day of the month. Or •Day of the Week: The nth day of the month (for example, First Monday, Second Wednesday, Last, etc.). Different combinations of weeks and days require separate schedules (for example, the 1st Monday and the 2nd Friday). Selecting the 5th week won't run the scan in a month without a fifth week. Select Last to always run the scan on the last week of the month. •At: Time the scan runs. •Starting: Date the scan starts. •Ending: (Optional) Date that the scan ends. Select to enable the end date. •Description: (Optional) Description of the trigger. |
|
|
Runs whenever the age of the last scan on the profile has been exceeded. •Trigger Enabled: Enables the scan trigger for use (selected by default). •Age: Select the age of the last scan in days, hours, and minutes (minimum time is 30 minutes). •Only At: (Optional) Time the scan runs. •Description: (Optional) Description of the trigger. |
|
|
Runs when the computer status changes from Offline to Online. (Requires Enterprise mode.) •Trigger Enabled: Enables the scan trigger for use (selected by default). •Starting: Date that the scan starts. •At: Time the scan runs. •Ending: (Optional) Date the scan ends. Select to enable the end date. •At: Time the scan ends. •Description: (Optional) Description of the trigger. |
2.(Optional) To delete a trigger, select it, then click Delete and accept the deletion.
Part 3: Linking Specific collections for Schedules
To specify the Collection(s) this profile will scan when the schedule runs:
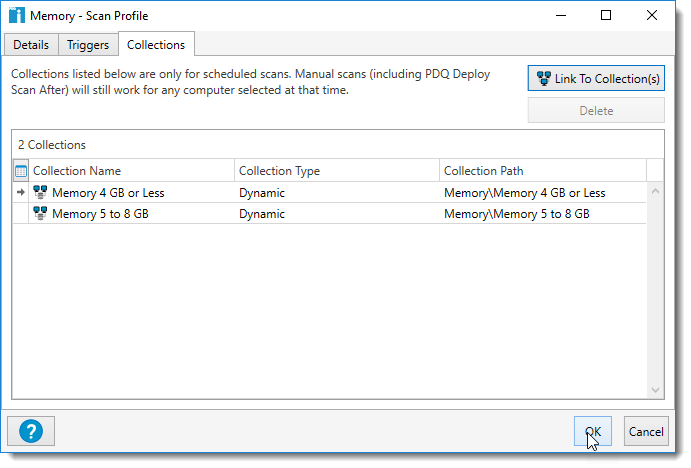
1.On the Collections tab, click the Link to Collection(s) button.
This opens the Select Collections window.

2.Select one or more collections to add.
You can use the filter to sort the collection name and even select Display Hidden Library Collections to view any collections in the library that you may have hidden.
3.Click OK.
NOTE: The collections tab is only used for scheduled scans. When the schedule starts, only the computers that are members of these collections will be scanned. Manual scans disregard the collections listed in the scan profile and will only scan the computer(s) selected at that time.
3.When you are finished configuring the scan profile, click OK.
The new scan profile is now available for use in the scan menus.
© 2018 PDQ.com Corporation. All rights reserved.
PDQ.com is a trademark of PDQ.com Corporation. All other product and company names are the property of their respective owners.
Help Version: 16.2.0.0