Auto Reports let you run, export, and save or email PDQ Inventory reports on custom schedules (Enterprise mode required). Auto reports are created and edited in the Auto Report window. This window contains the Details, Triggers, Mail, and Reports tabs for configuring the auto report.
You can associate or attach auto reports to reports in the Auto Report or Report windows. Auto Reports can even be run immediately without having to wait for a schedule, see Manually Running an Auto Report. You can view information about auto reports and manage them on the Auto Report page.
For information about managing and editing auto reports, see Managing Auto Reports. You can view more information about creating Auto Reports in the following video.
VIDEO: Creating Auto Reports in Inventory

Auto Reports
(https://www.youtube.com/watch?v=tfwMUpIVyGs)
Creating an Auto Report
This procedure includes the following parts:
•Part 1: Adding Auto Report Details
•Part 2: Configuring Auto Report Schedules
•Part 3: Configuring Auto Report Email (Optional)
•Part 4: Attaching Reports to Auto Reports
•Part 5: Running an Auto Report Now (Optional)
Part 1: Adding Auto Report Details
To create a new auto report:
1.Do one of the following:
•On the Main Console window, click Auto Reports ![]() , then on the Auto Reports page, click New
, then on the Auto Reports page, click New ![]() .
.
•In a Report Window on the Auto Reports tab:
•On the Auto Reports toolbar, click Attach to Auto Report ![]() > New Auto Report.
> New Auto Report.
•Click the Attach ![]() > New Auto Report.
> New Auto Report.
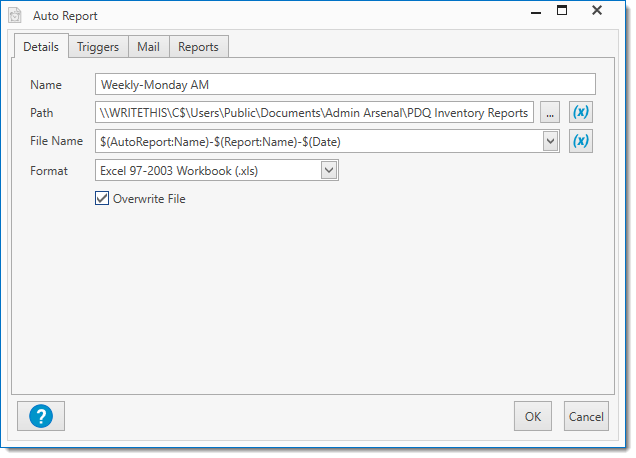
A new Auto Report window opens on the Details tab.
2.Enter or select the Details options as shown in the following table:
Setting |
Description |
|
Name |
Type an appropriate name (for example, Mid-week Inventory Reports). |
|
Path |
Type, paste, or browse for the UNC path to where you want to save report files. |
|
Type or select a variable for the file name for each time attached reports are generated. Variables are highly recommended. See the variables available in the graphic below. For more information about variables, see Variables. |
||
Format |
Select from the following file formats: •Report Only (no attachment) •Comma Separated Values (.csv) •Excel 97–2003 Workbook (.xls) •Excel Workbook (.xlsx) •Web Page (.html) •Portable Document (.pdf) •XML Paper Specification (.xps) •Web Archive (.mht) •Rich Text (.rtf) •Plain Text (.txt) •Image (.png) For details about these and other formats, see Export Formats. |
|
|
Overwrite File |
When selected, the previous report file will be overwritten and retain the same file name. NOTE: If there is an exclusive lock or hold on the existing file at the time the Auto Report is run, a new incremental file will be saved instead. |
2.Continue to Part 2: Configuring Auto Report Schedules to configure the schedule for the auto report.
Part 2: Configuring Auto Report Schedules
NOTE: If you plan to run the auto report immediately, skip to Step 3 to email and save the report to file or Step 4 to only save the report to file.
To select a schedule type and configure schedule triggers:
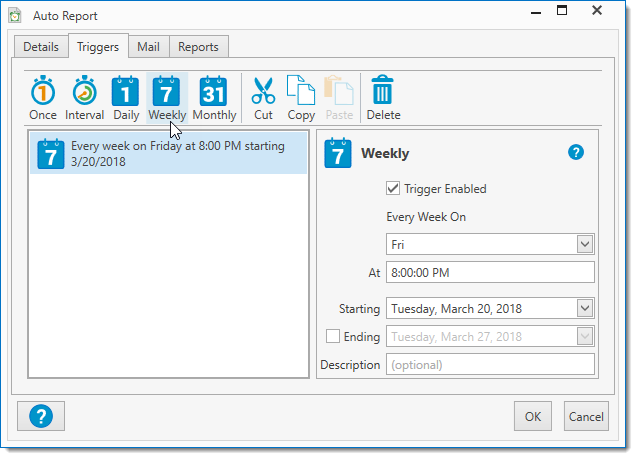
1.On the Triggers tab, click a Trigger Type, then define the schedule settings.
A schedule can include one or more triggers. Be careful of creating conflicts when setting frequencies or using multiple triggers. If triggers overlap, only one report will start. For example, having two triggers, one for every Monday at noon and one for every day at noon, will not start two reports every Monday. See the table below for additional scheduling tips.
The following table provides information on the schedule trigger types and settings available on the Triggers tab.
Trigger |
Icon |
Details |
|
Runs once in the future. •Trigger Enabled: Enables the schedule trigger for use (selected by default). •Trigger On: Select one time run date. •At: Time •Description: (Optional) Description of the schedule. |
|
|
Runs (and repeats) at a set time interval. •Trigger Enabled: Enables the schedule trigger for use (selected by default). •Every: Select the interval by day, hour, and minute. •Starting: Select first run date. •At: Time •Ending: (Optional) Date that the schedule ends. Select to enable the end date. •At: Time •Description: (Optional) Description of the schedule. |
|
|
Runs every day at the same time. •Trigger Enabled: Enables the schedule trigger for use (selected by default). •Every Day •At: Time •Starting: Date that the schedule starts. •Ending: (Optional) Date that the schedule ends. Select to enable the end date. •Description: (Optional) Description of the schedule. |
|
|
Runs every week at the same time on selected days of the week. •Trigger Enabled: Enables the schedule trigger for use (selected by default). •Every Week •On: Day (or days) that the scan runs. •At: Time •Starting: Date that the schedule starts. •Ending: (Optional) Date that the schedule ends. •Description: (Optional) Description of the schedule. |
|
|
Runs every month at the same time on selected days. •Trigger Enabled: Enables the schedule trigger for use (selected by default). •Every Month •On Day: The actual day (or days) of the month (for example, 1, 12, 23, etc.). If you select the 29th, 30th, or 31st of the month, the schedule won't run in months without those days. Select Last to always run on the last day of the month. Or •On The: The nth day of the month (for example, First Monday, Second Wednesday, Last, etc.). Different combinations of weeks and days require separate schedules (for example, the 1st Monday and the 2nd Friday.) Selecting the 5th week won't run in a month without a fifth week. Select Last to always run on the last week of the month. •At: Time •Starting: Date that the schedule starts. •Ending: (Optional) Date that the schedule ends. •Description: (Optional) Description of the schedule. |
2.(Optional) To delete a trigger, select it, then click Delete and accept the deletion.
3.Continue to Part 3: Configuring Auto Report Mail to setup mail for the auto report.
Part 3: Configuring Auto Report Email
This part is optional. If you don't want an auto report to send email, leave this tab blank.
NOTE: Your mail server must be properly configured before you add email settings. For details, see Mail Server in Preferences.
To configure mail for auto reports:
1.Click the Mail tab, then type (or copy and paste) email addresses in the To, Cc, or Bcc fields.
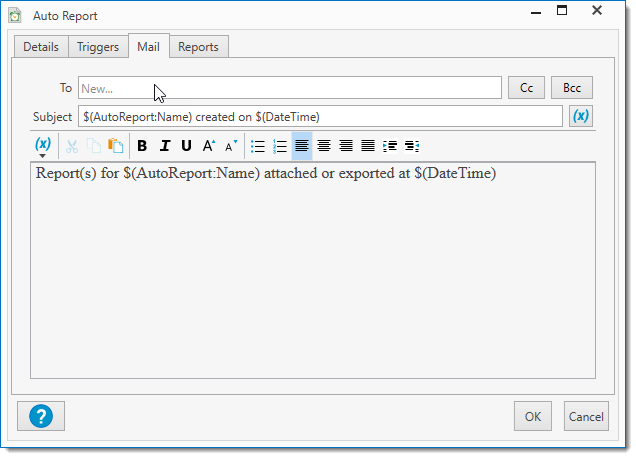
2.Type or select a variable for the subject of the email. The default is the name and created date.
Variables are highly recommended because they can automatically include the date the reports are run. For more information about variables, see Variables.
3.Type (or copy and paste) your message for the body of the email. The default is the name and created date.
4.(Optional) Use the formatting tools to format the body as desired.
5.Continue to Part 4: Attaching Reports to Auto Reports to attach reports to the auto report.
Part 4: Attaching Reports to Auto Reports
To attach reports to auto reports:
1.Click the Reports tab, then do one of the following:
•On the Auto Reports toolbar, click Attach Report ![]() .
.
•Click the Attach ![]() button.
button.
2.Select a default or custom report from the list.
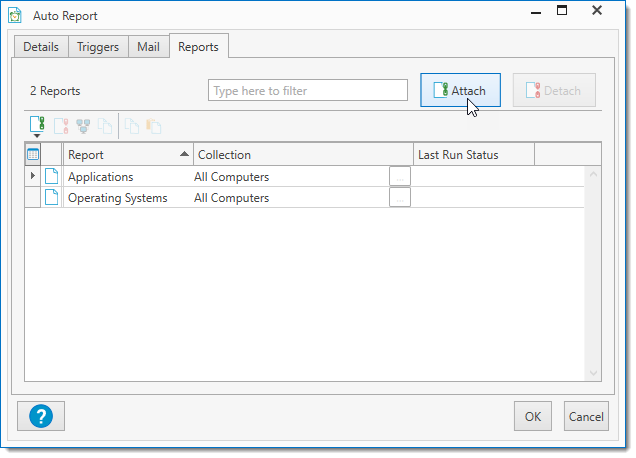
3.(Optional) To remove an auto report, select it, then click Detach Reports ![]() .
.
4.(Optional) To change the collection a report runs against, select a report, click Change Collection ![]() , select a new collection, and then click OK (or click the Select Collection button
, select a new collection, and then click OK (or click the Select Collection button ![]() from the Collection column and select a new collection).
from the Collection column and select a new collection).
5.When you finish configuring the new auto report, click OK to save changes and close it.
Auto reports are all stored on the main console tree in Auto Reports.
6.Continue to Part 5: Running an Auto Report Now if you wish to run the report immediately.
Part 5: Running an Auto Report Now
This part is optional.
To run an auto report now:
1.On the main console tree, select Auto Reports.
2.On the Auto Reports page, select an auto report ![]() .
.
3.Click the Run Now ![]() button (or right-click the Auto Report and select Run Now
button (or right-click the Auto Report and select Run Now ![]() )
)
The auto report is run immediately without having to wait for the schedule trigger.
© 2018 PDQ.com Corporation. All rights reserved.
PDQ.com is a trademark of PDQ.com Corporation. All other product and company names are the property of their respective owners.
Help Version: 16.4.0.0