The Report window is used to create, edit, print, and run a report. In generating accurate reports, the window can be used in two ways; Define Report is used to create and define the report, and Run Report is used to view the results of the report from the selected collection. These two uses can be toggled back and forth with the Define Report and Run Report buttons in the Toolbar. The Menu and Toolbar remains constant for both uses; however, the various details of the report differ by the report type.
Enterprise mode is required to save reports. Free mode users can create and run reports, but do not have the ability to save.
For instructions on creating reports, please see the following topics:
•Creating a Report from a Collection
Define Report (Basic, From Collection, and SQL)
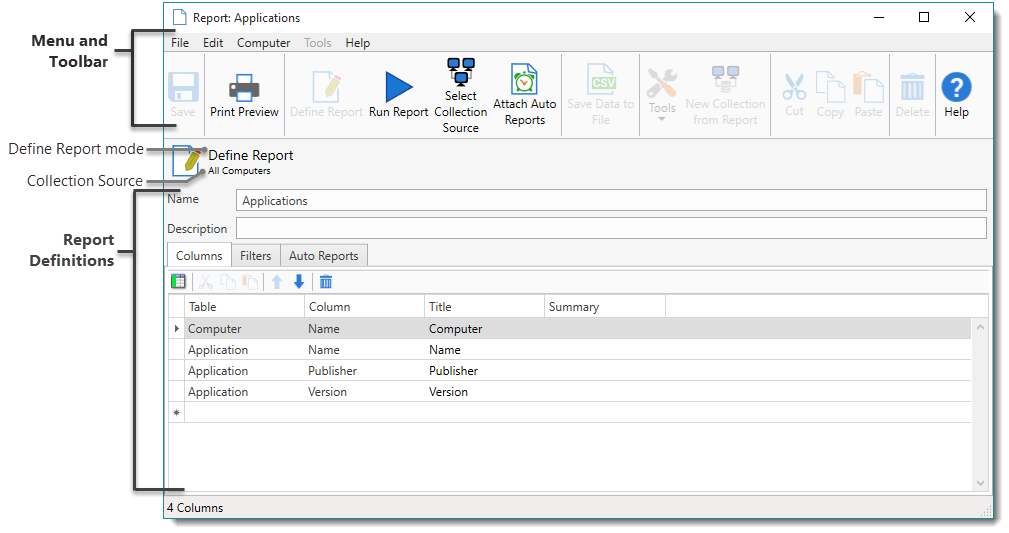
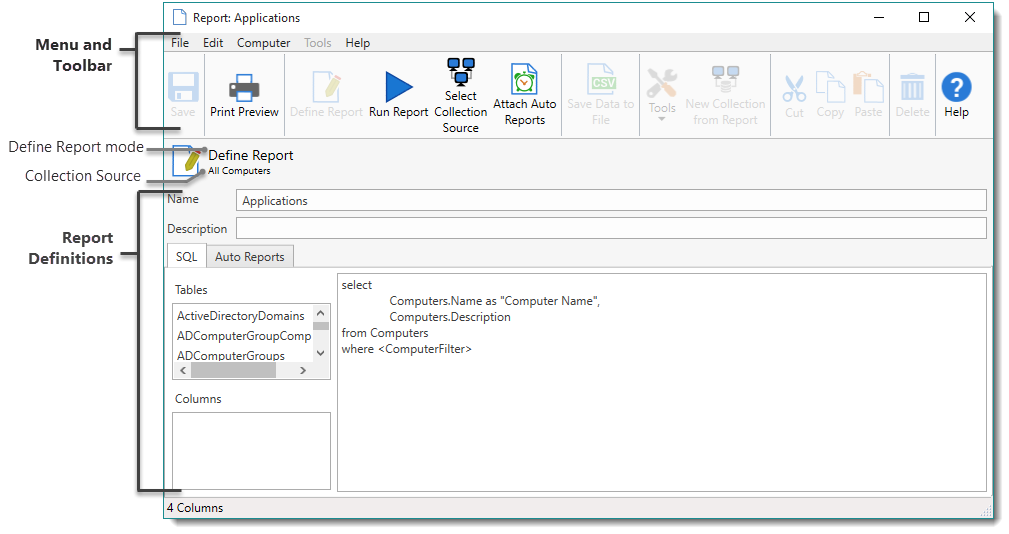
All report types are created and edited in the Report window using Define Report. This window contains the Menu and Toolbar, the collection source, and report definitions. The options available in the report definitions depend on the report type selected. A Basic Report and a Report from Collection includes tabs for Columns, Filters, and Auto Reports. A SQL Report includes tabs for SQL and Auto Reports. The Columns, Filters, and SQL tabs are used to specify the data included in the report, and the Auto Reports tab is used to determine whether reports are automatically run on a schedule (Enterprise mode required for Auto Reports). You can also manage aspects of reports on the main console. For information about managing and editing reports see Managing Reports.
Basic Report and Report from Collection
SQL Report
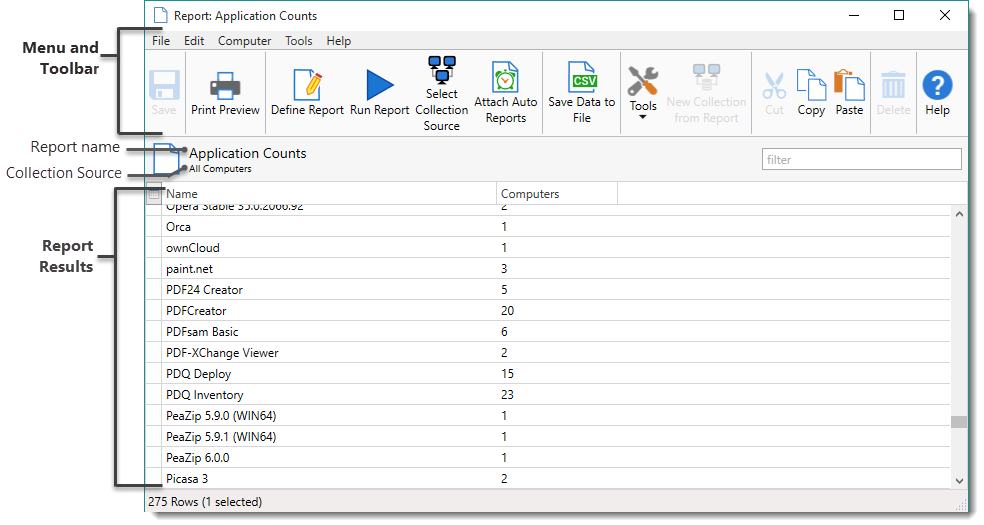
Run Report (All report types)
After a report has been defined, the results of the reports are viewed in the Report window using Run Report. With run report, you can change the collection on which the report will run, sort the various columns, print, and even save to a variety of file types for use in other programs. For more information, see Running Reports.
Report Window Menu and Toolbar
The File, Edit, Computer, Tools, and Help menus provide commands and controls for the report. The Toolbar provides the ability to toggle between defining the report and running the report as well as other quick, context-sensitive access to selected commands.

The following table provides quick reference details for each command.
Menu |
Command |
Icon |
Key Command |
Description |
File |
New Collection from Report |
|
|
Creates a new dynamic collection from the report. |
Save |
|
Ctrl+S |
Saves report. |
|
Save As |
|
Ctrl+Shift+S |
Saves report as another report. |
|
Define Report |
|
Ctrl+F8 |
Switches to Define report. |
|
Run Report |
|
F5 |
Switches to Run report and runs the report. |
|
Select Collection Source |
|
Alt+Shift+C |
Selects a collection for the report to run against. |
|
Attach Auto Reports |
|
|
Attaches the report to auto reports. |
|
Export |
|
Ctrl+E |
Exports the report. |
|
Save Data to File |
|
Ctrl+Alt+S |
Saves data from the active page to .csv, .xls, .xlsx, .pdf, .html, or .xps formats. |
|
Print Preview |
|
Ctrl+P |
Print Preview. |
|
Close |
|
Ctrl+W |
Closes the Report window. |
|
Edit |
Cut |
|
Ctrl+X |
Cuts the selected item. |
Copy |
|
Ctrl+C |
Copies the selected item. |
|
Paste |
|
Ctrl+V |
Pastes the selected item. |
|
Move Up |
|
Alt+Shift+Up |
Moves the selected item up. |
|
Move Down |
|
Alt+Shift+Down |
Moves the selected item down. |
|
Delete |
|
Del |
Deletes the selected item. |
|
Select All/Select None |
|
Ctrl+A |
Selects or deselects all items in a list or field. |
|
Computer |
View Computer Details |
|
Ctrl+O |
Select to view a page from the list of all inventory components. |
Scan Computers |
|
F6 |
Scans the computer in the active Computer window using a prebuilt or custom scan profile. Select from all available profiles. |
|
Tools |
Event Viewer |
|
Ctrl+Alt+E |
Opens the Microsoft Event Viewer. |
Manage with MMC |
|
Ctrl+Alt+M |
Opens the Microsoft Computer Management Console. |
|
PDQ Deploy |
|
Ctrl+Alt+D |
Opens the “Select PDQ Deploy Package” window within PDQ Deploy to initiate a deployment on the selected PDQ Inventory computer(s) or collection(s). |
|
Reboot/Shutdown |
|
Ctrl+Alt+B |
Opens the Reboot/Shutdown window for the selected computer(s) or collection(s). |
|
Remote Assist |
|
Ctrl+Alt+A |
Opens the Windows Remote Assistance window. |
|
Run Command |
|
Ctrl+Alt+C |
Opens the Run Command window for the selected computer(s) or collection(s). |
|
Remote Desktop |
|
Ctrl+Alt+R |
Opens the Windows Remote Desktop window. |
|
VNC |
|
Ctrl+Alt+V |
Opens the VNC remote control viewer. |
|
Wake |
|
Ctrl+Alt+W |
Opens the Wake-on-LAN window for the selected computer(s) or collection(s). |
|
Open ADMIN$ Share |
|
Ctrl+Alt+O |
Opens the ADMIN$ share on the remote computer. |
|
Customize |
|
|
Opens Tools Menu tab of the Tools page of the Main Console for customization of this menu. |
|
Help |
User Guide |
|
F1 |
Opens the PDQ Inventory help window. |
PDQ.com Website |
|
|
Opens the PDQ.com website. |
|
Buy Enterprise License |
|
|
Opens the PDQ.com “Purchase Licenses” web page. |
|
Check for Update |
|
|
Opens the Check for Update window with information and download options about available updates. |
|
Open Remote Repair |
|
Ctrl+Tilde |
Opens the PDQ.com Remote Repair utility. |
|
Open Elevated Command Prompt |
|
|
Opens a Command Prompt to be Run as Administrator. (Enterprise mode required to launch from within PDQ Inventory) |
|
Open Elevated PowerShell Prompt |
|
|
Opens PowerShell Prompt to be Run as Administrator. (Enterprise mode required to launch from within PDQ Inventory) |
|
Support |
|
|
Opens the different support web pages available from Admin Arsenal. Choose between Feedback & Support and Support Forums. |
|
About PDQ Inventory |
|
|
Opens the About PDQ Inventory window that shows the currently installed version and license mode. |
© 2018 PDQ.com Corporation. All rights reserved.
PDQ.com is a trademark of PDQ.com Corporation. All other product and company names are the property of their respective owners.
Help Version: 16.4.0.0