Custom data that is not obtained through scanning (for example, asset tag numbers, warranty information, purchase date, etc.) can be imported for multiple computers from a CSV file (comma-separated values) using the Custom Fields Import Wizard. Data will be imported as a custom field along with its value on the Custom Fields page of the Computer window.
To edit custom fields once created, on the Custom Fields page of the Computer Window click Configure Custom Fields (or click Options > Custom Fields, or press Ctrl+Comma) which will open the Custom Fields window. (Enterprise mode is required to view, create, and edit custom fields.)
This section includes procedures that explain how to import custom data using the Custom Fields Import Wizard.
To import custom data:
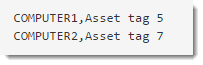
1.Create a CSV file with rows containing at least two columns; the name of the computer followed by the value of your custom field. Although the file is not required to have headers, the importing process is faster with headers.
NOTE: If importing unicode characters, the file must be saved as unicode.
2.On the Main Console window, click Options > Custom Fields, then click Import Wizard (or on the Custom Fields page of the Computer window, click Import Wizard).
A new Custom Fields Import Wizard window opens on the first page.
3.Type the path of the file in the Import CSV File field or select the file by clicking on the Select File ![]() button.
button.
This will populate the CSV Field with the headers listed in the file as well as populate the Contents section with any data that has been automatically mapped to existing custom fields.
4.(Optional) Uncheck Has Headers if the file does not contain headers.
The following table provides information on the Name Mapping section.
Column |
Details |
|
Name Mapping |
This section is used for mapping the data to existing custom fields or creating new ones. |
|
|
CSV Field |
Displays the first row of your CSV file. If the file does not contain headers, unchecking Has Headers will display the data in this column as Field 1, Field 2, Field 3, and so on. |
Custom Field Mapping |
Displays the mapped custom field or the action taken on each line of data. Click the drop down menu to map the data to an existing custom field, select (new custom field) to map the data to a new field, or select (skip) to not import the data. |
|
Type |
The type of data that will be collected for the custom field. Choose between Date, Date & Time, Integer, Text, or True/False. This field is not editable for existing custom fields. |
|
New Custom Field Name |
An editable field to allow you to input the new custom field name. This column is hidden by default until a new custom field is created. |
|
Contents of File Path name |
Displays data from the CSV file that will be imported. If the custom field to be imported has a new name, the column header will display the name from the CSV file followed by the new name in parenthesis. |
|
|
Show Skipped Fields |
Check to shows all fields that are skipped and will not be imported from the CSV file. By default, this is unchecked. |
5.Once all fields have been mapped, click Next.
The Errors and Preview page of the wizard is opened. The following table provides information on this page.
Column |
Details |
|
Displays any errors or conflicts discovered with the data to be imported. All errors must be fixed before being allowed to move forward. NOTE: If the CSV includes a computer that does not exist in PDQ Inventory, the import can still be completed but will not include that particular computer. |
||
|
Overwrite Existing Data |
Check this if custom data exists in PDQ Inventory that you wish to overwrite with the imported data. This is hidden by default and will only appear if the imported data is different from existing data. |
Preview section |
Displays a preview of the data to be imported. Column headers include the custom field type in parenthesis after the name. |
|
6.Once the page contains no errors, click Finish.
The imported data in the CSV file is populated in the Custom Fields page of the Computer Window. Each custom field will be listed along with its value. To edit the value in the Computer Window, click in the Value field.
See also
© 2019 PDQ.com Corporation. All rights reserved.
PDQ.com is a trademark of PDQ.com Corporation. All other product and company names are the property of their respective owners.
Help Version: 18.1.38.0