You can view the status of scans in progress, find information about failed scans, view other scan-related data on any collection page, and prioritize scans, in the Scan Status window, and in the Computer window on the Scans page. When scans fail, PDQ Inventory helps you diagnose the problem by providing a reason for the failure and a link to the failed scan More Info window. For details, see More Info: Failed Scans.
This section includes the following topics:
•Scan Status from a Collection Page
•Scan Status from the Computer Window
Scan Status from a Collection Page
To view scan information from a collection page:
1.On the Main Console window, select the All Computers page in the tree, or open a collection page.

2.Scroll or expand the window to see additional columns on the collection page grid.
The following table describes the columns that include scanning information:
Column |
Description |
Scan Status |
The status of the most recent scan of this computer: •Scan in progress: Real-time status as the computer is scanned, including: Queued, Queued (Priority), Connecting, Running, the individual scanner names from the selected scan profile, Returning Data, and Saving. •Successful: If the most recent scan of this computer succeeded, this field is empty. •More Info: If the most recent scan of this computer had an error, this field lists a More Info link and the primary cause of the error. To view additional information and support links about scan errors, click More Info or select the computer, then right-click and select Diagnose Scan Error. •Aborted: If the scan was canceled by the user, the field displays Aborted. •(Offline Settings): A computer is offline at the time of the scan and the offline settings are invoked (as defined in Preferences > Scanning, Offline Settings). |
Successful Scan Date |
The date of the last successful scan of this computer. |
Never Scanned |
Whether or not the computer has ever been scanned. Yes means it has never been scanned, and No means is has been scanned. |
Scan Error |
Details about the specific error that resulted in the scan error (typically the same information available on the More Info link under Scan Status errors). |
Scan User |
The user credentials used to perform the scan. |
3.(Optional) To stop a running scan, select the computer currently running the scan, then click Computer > Abort Scan ![]() (or right-click and select Abort Scan).
(or right-click and select Abort Scan).
To prioritize scan(s) from a Collection Page:
1.On the Main Console window, select All Computers in the tree, or open a collection page.
2.Select one or more computers listed as Queued in the Scan Status column.
Only computers with the status of Queued can be prioritized. All other statuses indicate a scan is already running.
3.Right-click the highlighted computers and select Prioritize This Scan.
4.The Scan Status will display Queued (Priority) to indicate the scan has been prioritized.
| Once a computer has been prioritized, it does not lose its priority status. Scans occur in the order they were prioritized, with the most recent prioritization occurring first. |
Scan Status from the Computer Window
To view scan information from the Computer window:
1.On the Main Console window, open All Computers, or a collection page.
2.Select a computer, then click Computer > View Computer Details (or press Ctrl+O or double-click it).
The Computer window opens for the selected computer.
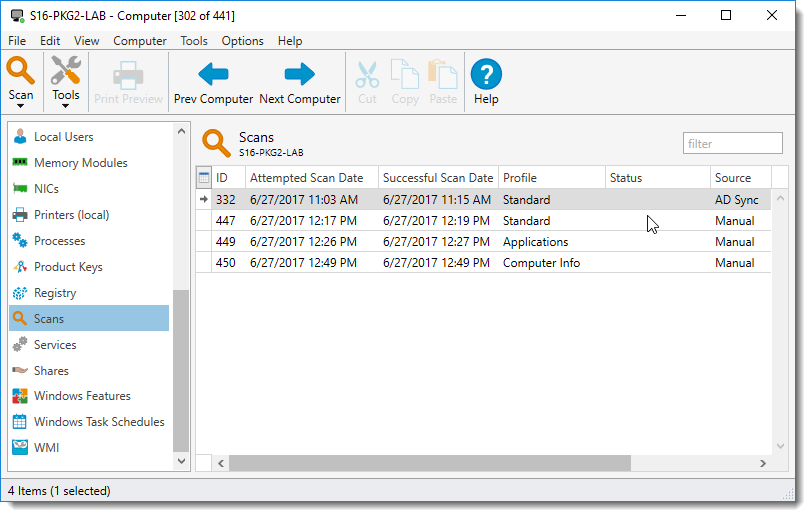
3.Select the Scans ![]() page.
page.
The following table describes the information displayed on the Scans page:
Column |
Description |
ID |
The unique scan ID number as assigned by PDQ Inventory. |
Attempted Scan Date |
The date and time that the scan was attempted. |
Profile |
The name of the scan profile. |
Status |
The current status of the scan: •Scan in progress: Real-time status as the computer is scanned, including: Queued, Connecting, Running, the individual scanner names from the selected scan profile, Returning Data, and Saving. •Successful: If the most recent scan of this computer succeeded, this field is empty. •More Info: If the most recent scan of this computer had an error, this field lists a More Info link and the primary cause of the error. To view additional information and support links about scan errors, click More Info or select the computer, then right-click and select Diagnose Scan Error. •Aborted: If the scan was canceled by the user, the field displays Aborted. •(Offline Settings): A computer is offline at the time of the scan and the offline settings are invoked (as defined in Preferences > Scanning, Offline Settings). |
Source |
How the scan was started: Manual, Schedule, AD Sync, or PDQ Deploy. (PDQ Deploy can be configured to initiate a scan after a deployment.) |
4.(Optional) To stop a running scan, click File > Abort Scan ![]() .
.
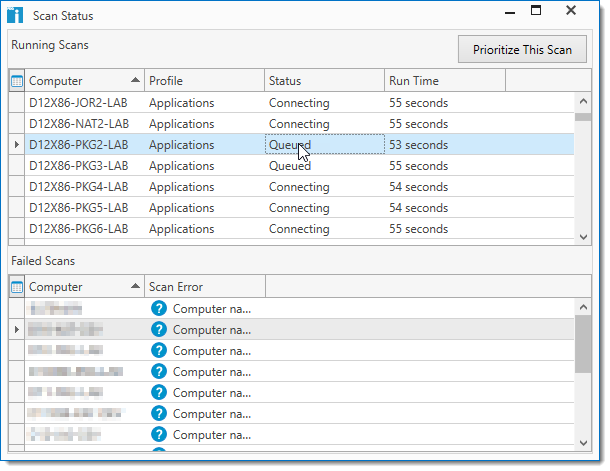
Scan Status Window
The Scan Status window shows running scans and the last failed scan for all computers in your database.
To open the Scan Status window:
1.On the Main Console window, click View > Scan Status (or press Alt+S).
The Scan Status window opens.
The following table describes the information available in the Scan Status window:
Options |
Description |
|
Prioritize This Scan |
Scans that are currently queued can be prioritized over other queued scans. NOTE: Enterprise mode is required to prioritize scans. |
|
Running Scans |
||
|
Computer |
The name of the computer being scanned. |
Profile |
The name of the scan profile used to scan this computer. |
|
Status |
Real-time status as the computer is scanned, including: Queued, Connecting, Running, the individual scanners names from the selected scan profile, Returning Data, and Saving. |
|
Run Time |
How long the scan has run. |
|
Failed Scans |
||
|
Computer |
The name of the computer. |
Scan Error |
The primary cause of the failure and a link for More Info. To view additional information and support links about the failed scan, click More Info. |
|
2.(Optional) To stop a running scan, select it, then right-click and select Abort Scan.
3.(Optional) Double-click any computer in the Failed Scans list to open its Computer window.
To prioritize scan(s) in the Scan Status window:
1.In the Status bar of the Main Console window, click # Computers Scanning.
The Scan Status window opens displaying all queued and running scans.
2.Select one or more computers listed as Queued in the Status column.
| Only computers with the status of Queued can be prioritized. All other statuses indicate a scan is already running. |
3.Click Prioritize This Scan or right-click the highlighted computers and select Prioritize This Scan.
4.The Scan Status will display Queued (Priority) to indicate the scan has been prioritized.
| Once a computer has been prioritized, it does not lose its priority status. Scans occur in the order they were prioritized, with the most recent prioritization occurring first. |
© 2020 PDQ.com Corporation. All rights reserved.
PDQ.com is a trademark of PDQ.com Corporation. All other product and company names are the property of their respective owners.
Help Version: 18.4.0.0