Static collections are populated manually by adding or removing computers from the collection.
Static collections are created and edited in the Static Collection window. You can also edit most aspects of static collections on the main console.
For information about managing static collections, see Managing Collections.
The section includes the following topics:
Creating a Static Collection
To create a static collection:
a)Do one of the following:
a.From any Collection page on the Main Console, multi-select (shift+click or ctrl+click) the selected computer names and click New Static Collection ![]() (or right-click and select New Static Collection, or Collection > New Static Collection, or press Ctrl+Shift+N).
(or right-click and select New Static Collection, or Collection > New Static Collection, or press Ctrl+Shift+N).
A new Static Collection window opens with the selected computers listed in the Members pane.
b.On the main console toolbar, click New Static Collection ![]() (or Collection > New Static Collection or press Ctrl+Shift+N).
(or Collection > New Static Collection or press Ctrl+Shift+N).
A new blank Static Collection window opens.
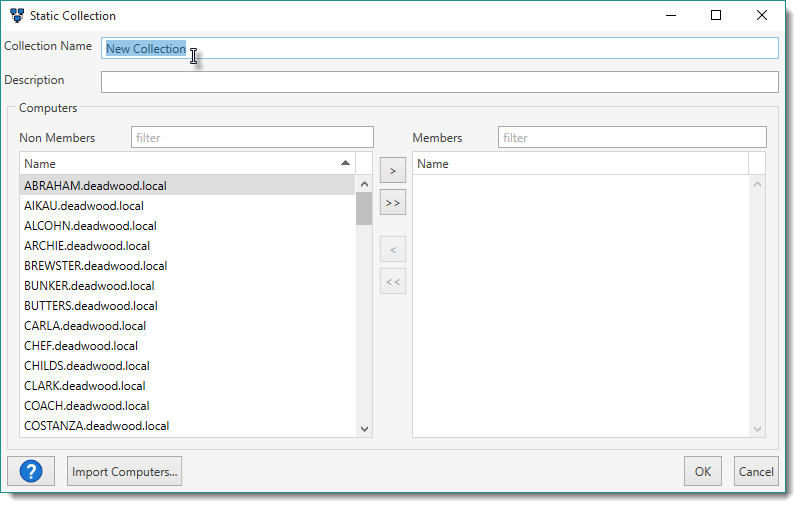
2.Type a name for the collection.
Use a name that explains the purpose of the collection.
3.(Optional) Include a description for the collection.
Like the name, it’s important to provide a description that clearly explains the purpose of the collection. For additional guidance, look at the descriptions of the prebuilt collections.
4.To add computers to the collection, do the following:
a.(Optional) Filter the list to find computers.
Only computers that are already added to your local database appear in the Non Members list.
a.Select one or more computers (Shift+click or Ctrl+click), then click Add Selected Computers ![]() to add them to the Members list.
to add them to the Members list.
c.(Optional) To add all computers from the Non Members list, click Add All Computers ![]() .
.
5.(Optional) To add computers from a text file, click Import Computers, browse to and select a file, then click Open.
IMPORTANT: The Import Computers function will only import computers into the Static Collection that already exist in the PDQ Inventory database. This import will not add new computers to PDQ Inventory.
Import files must be formatted as follows:
File Format |
Description |
.txt (plain text) |
One computer name per line. |
.csv (comma-separated values or CSV) |
The computer name must be the first item of each line (or column), without a header row, with only one computer name per row. |
6.When you are finished configuring the collection, click OK.
The new static collection is added to the main console tree. If you selected another static collection before creating a new one, it will be nested in the selected collection. You can move the collection to a different part of the tree by clicking the collection and dragging to a new location.
For information about editing or managing static collections, see Editing Static Collections or Managing Collections.
Editing Static Collections
Static collections can be edited in the Static Collection window or on the main console. For additional information about managing static collections, see Managing Collections.
To edit a static collection in the Static Collection window:
1.On the main console window tree, select a static collection ![]() .
.
2.Double-click the collection name in the tree (or click Collection > Edit Collection or press Ctrl+Shift+O or click Edit ![]() on the collection page).
on the collection page).
3.To edit the collection in the Static Collection window, see the following table for a list of tasks and details:
Task |
Details |
Change the Name or Description |
Edit the name or description. |
Add Computers |
In the Non Members list, do one of the following: •Select one or more computers, then click Add Selected Computers •To add all computers, click Add All Computers |
Import Computers |
Click Import Computers, browse to and select a file, then click Open. For more details, see Creating a Static Collection, step 5. IMPORTANT: The Import Computers function will only import computers that already exist in the PDQ Inventory database. This import will not add new computers to PDQ Inventory. |
Remove Computers |
In the Members list, do one of the following: •Select one or more computers, then click Remove Selected Computers •To remove all computers, click Remove All Computers |
4.When you finish editing, click OK to save changes and close the collection.
To edit a static collection on the main console:
1.On the main console window tree, select a static collection ![]() .
.
2.See the following table for a list of tasks and details:
Task |
Details |
Change the Name |
Select a collection in the tree, right-click it and select Rename (or press F2), then edit the name. |
Add Computers |
From any collection page (static or dynamic), do one of the following: •Select one or more computers, then drag and drop them on a static collection in the tree. •Select one or more computers, copy (press Ctrl+C or click Edit+Copy or right-click and select Copy), select a static collection, then paste (press Ctrl+V or click Edit+Paste or right-click and select Paste). |
Import Computers |
To add computers by importing a list from a text file: 1.In the tree, select a static collection. 2.Right-click it and select Import (or press Ctrl+I), 3.Browse to and select a file, then click Open. For more details, see Creating a Static Collection, step 5. IMPORTANT: The Import Computers function will only import computers that already exist in the PDQ Inventory database. This import will not add new computers to PDQ Inventory. |
Remove Computers |
To remove computers from a static collection: 1.On any static collection page, select one or more computers, then click Delete The Delete Computer window opens. 2.Do one of the following: •To remove the computer(s) from the collection, click Remove from Collection. •To delete the computer(s) from the PDQ Inventory database, click Delete Computers. •To not remove or delete computer(s), click Cancel. |
Delete a Collection |
To delete a static collection, select a collection in the tree, click Delete |
Manage Collections |
You can move collections on the tree or nest them in other collections. For details, see Managing Collections. |
© 2020 PDQ.com Corporation. All rights reserved.
PDQ.com is a trademark of PDQ.com Corporation. All other product and company names are the property of their respective owners.
Help Version: 19.1.96.0