Computers can be added manually or if you use Active Directory, with Active Directory Sync (Pro or Enterprise mode required). When computers are added to your database, they are automatically scanned using the Default Scan Profile.
This section contains the following topics:
•Adding Computers with Active Directory Sync
Video: PDQ Inventory Active Directory Synchronization

(https://www.youtube.com/watch?v=NijFhoQfRzo)
Adding Computers with Active Directory Sync
Active Directory Sync is the preferred method for adding computers with Active Directory because it can be configured to automatically sync them on a schedule to capture future changes made in AD (Pro or Enterprise mode required). Set global options for Active Directory Sync on the Active Directory page in Preferences.
To add Active Directory computers automatically:
1.On the Main Console window, click File > Preferences > Active Directory.
2.Under Active Directory Sync, click Auto Sync Enabled.
3.Select the frequency of the sync with Sync Every; the default is every hour.
4.Select the appropriate Delete Mode from the following:
a.Import Only (no delete): Computers deleted from Active Directory will not be deleted from the PDQ Inventory database. They must be manually deleted. (Default delete mode)
b.Mixed Sync (do not delete computers not part of sync): Computers that are included in a container and added to the database, but then deleted from Active Directory, will be deleted from the PDQ Inventory database as well. Computers that are added manually to the PDQ Inventory database must still be deleted manually.
c.Full Sync (delete all computers not part of your sync): Deletes all computers from the PDQ Inventory database that aren't in one of the containers, including computers that were added manually or via another source. Use this option to make PDQ Inventory mirror your Active Directory Containers exactly.
5.Click Include Container to add your domain(s) to the database.
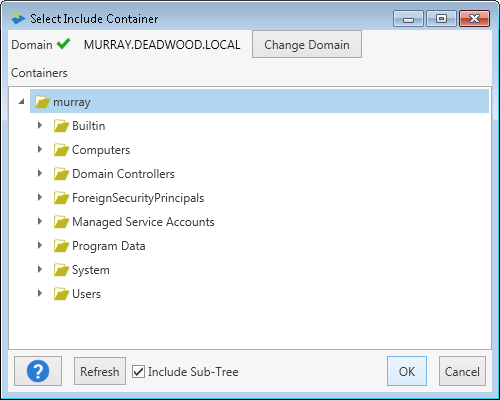
6.In the Select Include Container window:
a.Browse AD containers.
b.(Optional) To switch to a different domain, click Change Domain.
c.(Optional) Click Include Sub-Tree to display sub-trees (selected by default).
d.Select a container, then click OK to add it to the database.
e.If you have multiple domains, repeat as needed.
7.(Optional) To exclude containers, click Exclude Container, then follow the sub-steps as shown in step 4.
8.(Optional) Set additional Active Directory Sync options as needed.
For details, see the Active Directory page in Preferences.
9.(Optional) To immediately sync with AD, click Sync Now.
PDQ Inventory adds, scans, and saves your Active Directory computer information to the database.
10.When you are done configuring Active Directory Sync, close the Preferences window.
The first auto sync will run as set by the Sync Every interval.
Adding Computers Manually
Computers can also be added using the Add Computer window. You can type the names of the computers, copy and paste names directly in the computer list, import lists of computers, or browse your AD domains and containers.
To add computers manually:
1.On the Main Console window, click Add Computers on the toolbar (or click Computer > Add Computers or press Ctrl+Shift+A).
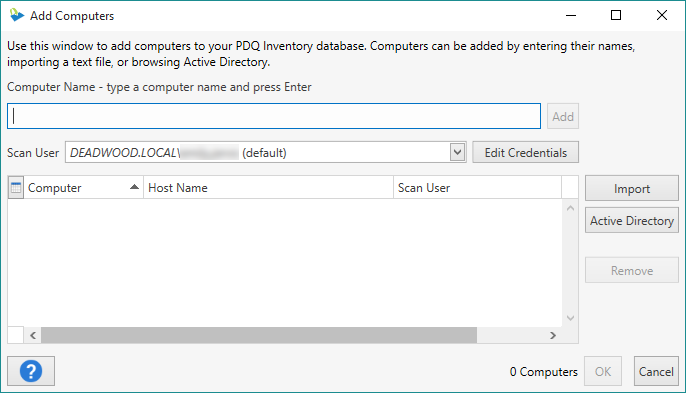
2.(Optional) Change or edit the scan user credentials.
Select a different user or click Edit Credentials to add or change credentials. For more information, see Managing Credentials/Scan Users or Credentials in Preferences.
3.(Optional) To manually add a computer, type the computer name, then click Add.
PDQ Inventory attempts to resolve the names of the computers you add using the current Windows network configuration (DNS is preferred). The full names provided by this process will be used, usually FQDN (Fully Qualified Domain Names). Computers resolved by DNS appear with a green checkmark ![]() .
.
NOTE: If the computer name can’t be resolved, a warning icon ![]() with a More Info link displays under Host Name. Check the name you typed and try it again. If you still can’t add a computer manually, click the More Info link for additional help. Click Remove (or press Delete) to delete unresolved computer names from the list.
with a More Info link displays under Host Name. Check the name you typed and try it again. If you still can’t add a computer manually, click the More Info link for additional help. Click Remove (or press Delete) to delete unresolved computer names from the list.
4.(Optional) To add computers from a text file, click Import, browse to and select a file, then click Open.
Import files must be formatted as follows:
File Format |
Description |
.txt (plain text) |
One computer name per line. |
.csv (comma-separated values or CSV) |
The computer name must be the first item of each line (or column). |
TIP: You can also copy and paste a list of computers (for example, from an email or a spreadsheet file) into the Add Computer window. Select and copy the list in the source, click the computer list, then press Ctrl+V or right-click and select Paste.
5.(Optional) To manually add computers using Active Directory, click Active Directory.
NOTE: Active Directory Sync is the preferred method for adding computers with Active Directory because it can be configured to automatically sync them on a schedule to capture future changes made in AD (Pro or Enterprise mode required). For details, see Adding Computers with Active Directory Sync.

a.Browse AD containers to locate computers.
To switch to a different domain, click Change Domain.
b.(Optional) Click Include Sub-Tree to display sub-trees (selected by default).
c.Select one or more computers (Shift+click or Ctrl+click), then click Add Selected Computers ![]() to add them to the list.
to add them to the list.
d.(Optional) To add all computers in the Computers list, click Add All Computers ![]() .
.
e.Click OK to add your selections to the list.
6.When you are finished adding computers to the list, click OK.
Your computers are immediately scanned (with the Default Scan profile) for their hardware, software, and Windows configuration information. PDQ Inventory uses this data to automatically populate the prebuilt collections.
© 2016 Admin Arsenal, Inc. All rights reserved.
Admin Arsenal is a trademark of Admin Arsenal, Inc. All other product and company names are the property of their respective owners.
Help Version: 8.1.0.0