Use Deploy Once when you want to quickly and easily deploy one or more package. Deployments can be made up of both Standard packages and Auto Download packages. Deploy Once is also useful to quickly and easily deploy package(s) attached to a schedule without having to wait for approval or its scheduled deployment. For an introduction to the Deploy Once window, see Deploy Once Window.
NOTE: Enterprise Mode is required for Auto Download packages.
VIDEO: Quickly Deploy an Application Using Deploy Once

(https://support.pdq.com/hc/en-us/articles/115000016892)
To create a manual deployment using Deploy Once:
1.On the Main Console window, do one of the following:
•(With or without selecting a package or folder) On the Toolbar, click Deploy Once ![]() .
.
•(With or without selecting a package or folder) Click File > Deploy Once (or press Ctrl+D or right-click and select Deploy Once).
•On the selected Package window, click Deploy > Deploy Once.
•Multi-select packages and/or folders (Shift+click or Ctrl+click) and click Start a deployment with these packages on the Multiple Packages page.
•Select the schedule of the package and click Deploy Once in the Schedule Details panel.
IMPORTANT: The packages will deploy in the order in which they are selected and appear in the Deploy Once window.
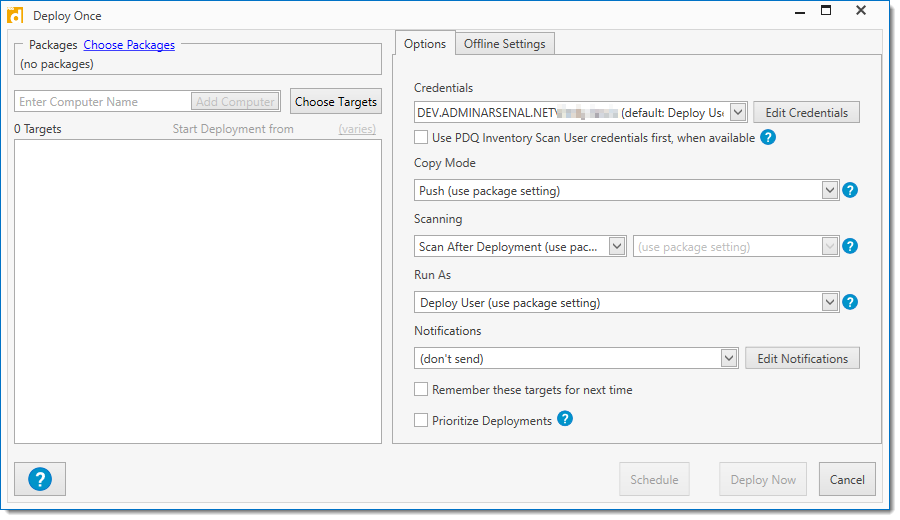
A new Deploy Once window opens (with or without packages listed in the Package panel on the top left).
2.(Optional) To remove a package, click the delete icon ![]() to the right of the package name.
to the right of the package name.
3.(Optional) To add packages, click Choose Packages.
The Select PDQ Deploy Packages window opens.
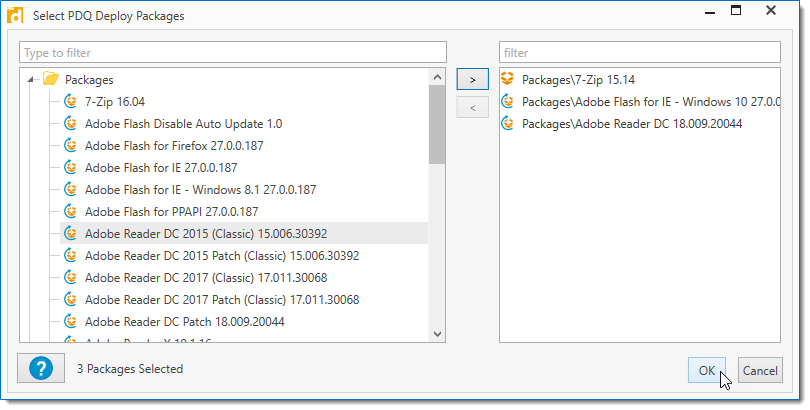
Select one or more packages (Shift+click or Ctrl+click), then click Add Selected Package ![]() to add them to the deployment.
to add them to the deployment.
IMPORTANT: If an attached Auto Download Package has been edited, all edits (including additional steps) will be deployed with Deploy Once. For information on editing an Auto Download Packages, see Editing and Adding Steps to an Auto Download Package.
4.(Optional) To manually add a target computer to the list, type a computer name in the Enter Computer Name field, then click Add Computer. Alternately, you can also paste a target computer name (or list of names) directly into the Targets area of the window. If copying a list of names, ensure that there is only one target computer name per line.
When you add a target computer manually, the name appears in the Target(s) list and the system (DNS) checks to be sure it exists on the network. Targets resolved by DNS appear with a green checkmark ![]() .
.
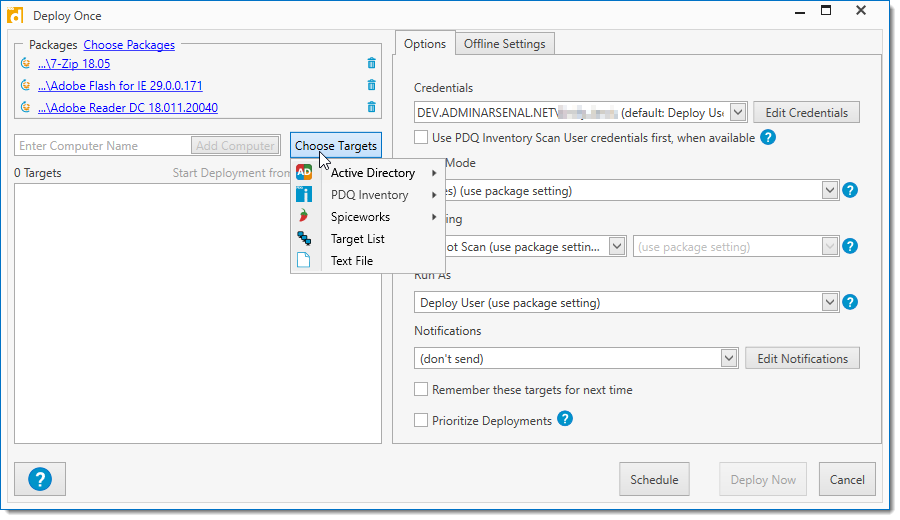
5.(Optional) To add target computers click Choose Targets, then select a source:
Source |
Description |
|---|---|
Active Directory |
Select Container to add all target computers within a container or select Computers to choose individual computers within a container. |
PDQ Inventory |
Select Collection to add all target computers within a collection or select Computers to choose individual computers within a collection. |
Spiceworks |
Select Group to add all target computers within a group or select Computers to choose individual computers within a group. |
Target List |
Select target computers using other PDQ Deploy Target Lists. |
Text File |
Select a text file containing a list of target computer names. |
NOTE: You can select a container, collection, or group in the Deploy Once window however, it will choose all targets in the source at the time of selection but the source itself will not be dynamically linked.
6.(Optional) To change the step of the package that will be used to start the deployment, click Step 1 to select from all steps available in the package.
| This can be changed for all packages when selected from the link above the Targets box, or each individual target can have its own start location. |
NOTE: Choosing a starting step is only available in Enterprise mode and when deploying a single package.
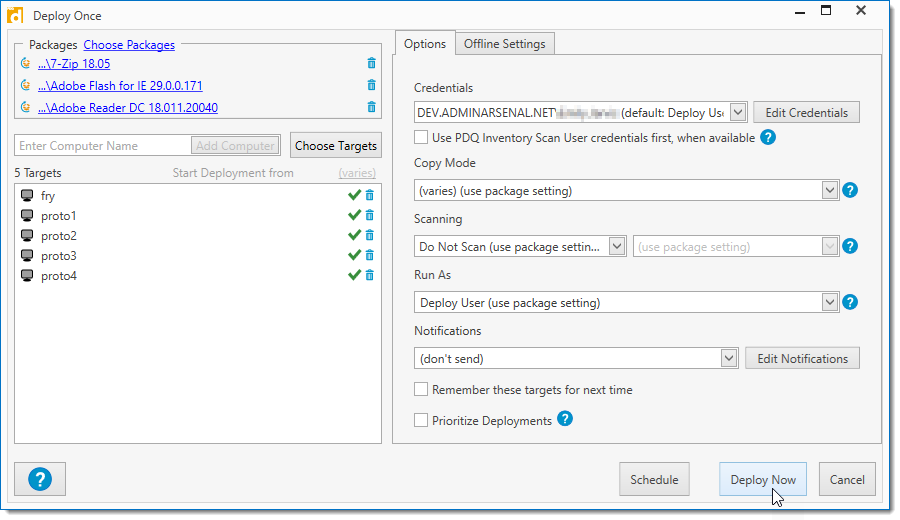
7.Click the Options tab and define the settings you want to apply to the deployment.
The following table provides information on the Deployment settings available in the Options tab of the Deploy Once window:
Option |
Details |
|
|---|---|---|
The Deploy User credentials used by all deployments from the current deployment. For more information see Credentials in Options. This is the username and password used to connect to the target computer and copy over the necessary files and start the target service. This user must have administrative rights on the target computer, which are needed to copy files to the ADMIN$ share and create and start the remote service. It can be a user account local to the target computer or a domain user if using Active Directory. NOTE: This selection is saved for use the next time you start a new deployment with this window. |
||
Use PDQ Inventory Scan User credentials first, where available |
Allows PDQ Inventory's Scan User credentials to be used during the deployment. If selected, the PDQ Inventory Scan Users credentials will be used first. If no Inventory Scan User credentials exist for that target computer, the selected PDQ Deploy credentials will be used. NOTE: Local Administrator Password Solution (LAPS) can be used by if the target computer's selected Scan User credentials are configured properly to use LAPS. IMPORTANT: Enterprise mode is required in both PDQ Deploy and PDQ Inventory. If running in Client or Server mode, PDQ Inventory must also be in Client or Server mode. NOTE: This selection is saved for use the next time you start a new deployment with this window. |
|
Defines how PDQ Deploy copies deployment files to targets (requires Enterprise mode). You can use the the Package Properties Copy Mode or override it here. When files (such as installation files) are copied to a target, PDQ Deploy can use either Push or Pull Copy Mode. By default, PDQ Deploy uses Push Copy Mode. VIDEO: PDQ Live! Understanding Push and Pull Deployments |
||
|
Push |
Copies files to the targets from the PDQ Deploy computer. This method is best if the package’s install files are located on the PDQ Deploy computer. This option is the default copy mode. Bandwidth throttling applies to all simultaneous file copies combined. |
Pull |
Sends lists of files to the targets which then pull the files from a centralized location. This method works best in WAN environments where the files may be on a file server closer to the targets than the computer where PDQ Deploy is running. For this method to work, all files need to be accessible using a UNC path (e.g. \\server\share\installer.msi). Bandwidth throttling is not enforced when using Pull Copy Mode. WARNING: Files on fixed or mapped drives are not accessible to the target computers; therefore, a valid UNC path must be provided. IMPORTANT: This setting is available only in Enterprise mode. |
|
Select whether or not PDQ Inventory scans target computers after a deployment to identify what is installed on each computer. If your deployment doesn't install an application, you may want to disable inventory scanning for the deployment. IMPORTANT: This feature is available only in Enterprise mode and also requires PDQ Inventory in Enterprise mode. If you are running in Client Mode, PDQ Inventory must be installed on both the Client computer and the Server computer. Additionally, the target computer must already be in PDQ Inventory with a name or hostname that matches the name used in PDQ Deploy. Set the Program Default in Preferences > Deployments or override the default here. |
||
|
Scan after Deployment
|
Initiates an inventory scan from PDQ Inventory after the deployment to identify what is installed on each workstation. Scan after Deployment attempts to scan target computers even if deployments fail. This feature can be very helpful in maintaining up-to-date inventory for target machines. The target computers must already be in PDQ Inventory with names or hostnames that match the names used in PDQ Deploy. You may choose which Scan Profile to use. The default Scan Profile is defined in PDQ Inventory in Preferences > Scan Profiles. You can choose to scan with any Scan Profile that has been configured in PDQ Inventory. It is common to use either the Applications or Standard scan profiles. |
Do Not Scan |
Does not scan target computers after deployment. |
|
Determines how the current deployment is executed on target computers. Note: The Run As settings at the Package level may be superseded by any explicit Run As settings at each Step level. For a sample demonstration of the Run As options, see the following video. VIDEO: Deployment Run As Options |
||
Deploy User |
Silently executes deployments on target computers. This setting is appropriate for the vast majority of deployments. |
|
Deploy User (Interactive) |
Executes deployments that include both silent and interactive steps. This setting is the same as Deploy User with one important exception—the Windows process running the deployment is run in interactive mode. This setting is most appropriately used for individual deployments that require user input, but the overall process still requires Administrator rights that logged on users may not have. This type of deployment requires more processing resources. IMPORTANT: This feature is available only in Enterprise mode. |
|
Local System |
Executes deployments using the local System account on the target computer. PDQ Deploy connects to the target computer, copies the specified files, then runs the actual deployment service using the Local System credentials. This setting is used only for installations that require Local System. These types of deployments are very rare. |
|
Logged on User |
Attempts to run packages in Interactive mode as the Logged On User of the target machine. This setting is used to deploy applications that are installed per user or when the logged on user needs to provide information for the deployment to succeed such as a license key. It can also be used to modify the HKEY-CURRENT-USER registry hive for the logged on user or to access user-specific settings such as %APPDATA% or the logged on user’s User directory. IMPORTANT: This feature is available only in Enterprise mode. |
|
Sends an email notification when the deployment finishes. (Enterprise mode required.) Select one of the two default deployment notifications, Full Details or Summary, or create a custom notification by clicking Edit Notifications. For more information about post deployment emails, see Receiving a Status Email After Deployment and Mail Server Preferences. IMPORTANT: You must configure the Mail Server settings in Preferences as well as designate at least one email recipient in the selected Post Deployment Notification before you can enable this option. NOTE: This selection is saved for use the next time you start a new deployment with this window. |
||
Remember these targets for next time |
Saves the list of targets to use the next time you start a deployment with Deploy Once. |
|
This deployment will be prioritized above all others that are currently queued. NOTE: Using this feature will allow the targets to exceed the Concurrent Targets per Deployment, but will not exceed the Total Concurrent Targets set in Preferences > Performance. |
||
8.Click the Offline Settings tab and define the settings you want to apply to the deployment.
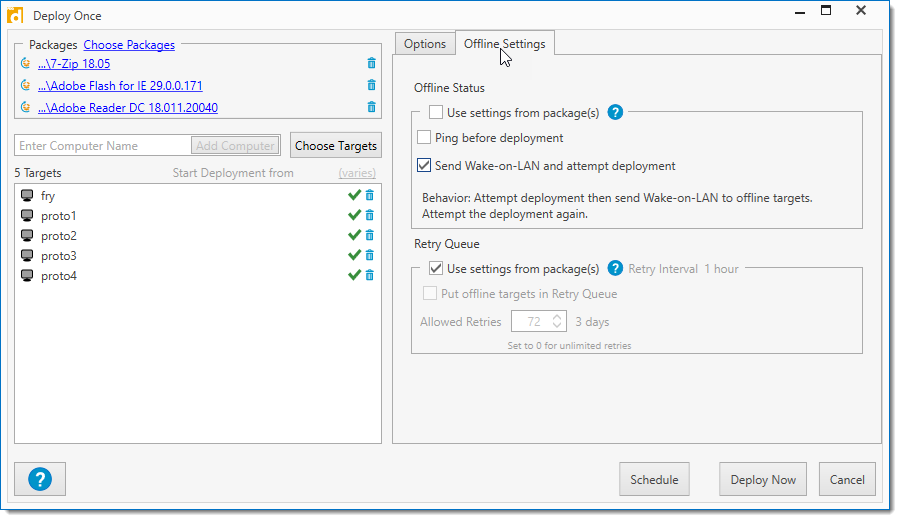
The following table provides information on the Deployment settings available in the Offline Settings tab of the Deploy Once window:
Option |
Details |
|
|---|---|---|
Offline Status settings determines whether target computers will receive a ping or Wake-on-LAN prior to deployment. |
||
Use settings from Package |
Uses the Offline Status settings defined at the Package level. For more information, see Creating a New Package, Step 1: Package Properties. If you select this option but the Offline Status settings are not defined at the Package level, then PDQ Deploy uses the global Offline Status settings settings defined in Preferences. When you select this option, the subsequent settings are disabled. |
|
Ping before deployment |
Performs a ping (ICMP echo) to all addresses returned by DNS before attempting the deployment on the first to respond. If the target does not respond to the ping within 2 seconds, then the deployment is not attempted on that target. Enabling this option can increase the overall speed of the deployment because PDQ Deploy doesn’t waste time with offline computers. NOTE: Typically, the ping should take only a few milliseconds. However, if your DNS isn’t solid, your network is experiencing latency issues, or your computers have multiple addresses in DNS, then the ping response may take more than 2 seconds. When this is not selected, PDQ Deploy attempts the deployment regardless of the online or offline status of the target computer. If the target is offline or otherwise unavailable, Windows will timeout after ~60 seconds. Leaving this unchecked can decrease the overall speed of the deployment due to these attempts and extra wait time. |
|
Attempts the deployment then sends a Wake-on-LAN to offline target computers. The deployment is attempted again if it comes online. After 5 minutes if the target computer is still offline, the deployment will be attempted again. The advantage of this feature is that offline target computers can immediately be made available for deployment. However, it can increase deployment time. IMPORTANT: This feature is available only in Enterprise mode of both PDQ Deploy and PDQ Inventory. Furthermore, PDQ Inventory must have the MAC address of the target computers’ NICs. |
||
Retry Queue settings determine how PDQ Deploy handles deployments when the target computers are offline. |
||
Use settings from Package |
Uses the Retry Queue settings defined at the Package level. For more information, see Creating a New Package, Step 1: Package Properties. If you select this option but Retry Queue settings are not defined at the Package level, then PDQ Deploy uses the global Retry Queue settings defined in Preferences. When you select this option, the subsequent Retry Queue settings are disabled. |
|
Put Offline Targets in Retry Queue |
Enables the Retry Queue. By default, target computers that are unreachable or offline during a deployment are held in the Retry Queue and deployment is retried. |
|
Allowed Retries |
Sets the number of retry attempts for an offline target computer. This applies per target per deployment. The default setting is 72. To set unlimited retries, set this value to 0. |
|
9.(Optional) If you decide to schedule the deployment rather than run it immediately, click Schedule.
For information about scheduling deployments, see Creating Scheduled Deployments.
10.When you are ready to execute the deployment, click Deploy Now.
11.View the progress and the status of the deployment in Deployment Status in the Main Console Window.
During a deployment you can stop deploying to one or more of the pending target computers by right-clicking on the target(s) and clicking Abort. To retry deployments to target computers that fail, right-click the target, and click Redeploy or press Ctrl+R. If a deployment to a target computer fails, you can view details about the failure and possible solutions by clicking the More Info link or the Steps link.
While a deployment is queued you can prioritize the entire deployment or individual targets within the deployment. To prioritize the whole deployment, on the All Deployments page, right-click a deployment (Deployments panel) then select Prioritize Deployment. To prioritize an individual target in the deployment, on the All Deployments page, select a deployment from the Deployment panel, right-click specific target(s) (Target panel) then select Prioritize Targets.
NOTE: Using the prioritize feature will allow the targets to exceed the Concurrent Targets per Deployment, but will not exceed the Total Concurrent Targets set in Preferences > Performance.
For more information about what happens during and after a deployment, see Verifying Deployment Status.
© 2022 PDQ.com Corporation. All rights reserved.
PDQ.com is a trademark of PDQ.com Corporation. All other product and company names are the property of their respective owners.
Help Version: 19.3.254.0