The main console window provides access to your configured packages, deployments, schedules, and target lists. You can also access and import more than 200 ready-to-deploy and tested PDQ Deploy packages from the Package Library.
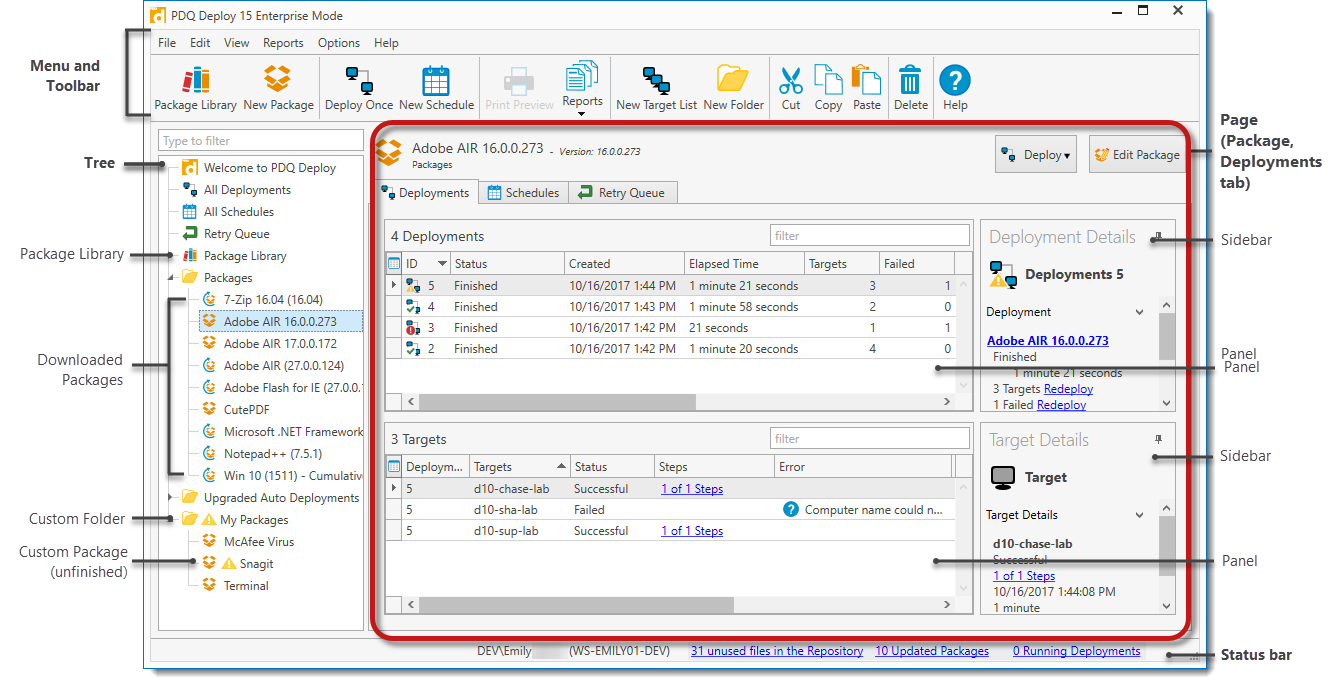
The main console window is comprised of four navigational components—Menu and Toolbar, Tree, Page, and Status bar.
This section provides information on these components and includes the following topics:
•Example Page—Specific Package
•Example Page—Multiple Packages Selected
Menu and Toolbar
The File, Edit, View, Reports, Options, and Help menus provide commands and controls for the components and content you create and edit in PDQ Deploy. The Toolbar provides quick, context sensitive access to selected commands.

The following table provides quick reference details for each command.
Menu |
Command |
Icon |
Key Command |
Description |
|---|---|---|---|---|
File |
New Package |
|
Ctrl+N |
Opens New Package window. |
New Target List |
|
Ctrl+Shift+T |
Opens new blank Target List window. |
|
New Folder |
|
Ctrl+Shift+F |
Creates new folder for organizing packages and target lists. |
|
New Schedule |
|
|
Opens a new blank Schedule window. (Enterprise mode required) |
|
Duplicate |
|
Alt+Insert |
Duplicates selected Package, Target List, Schedule, or Deployment. |
|
Open |
|
Ctrl+O |
Opens selected Package, Target List, Schedule, or Deployment. |
|
Deploy Once |
|
Ctrl+D |
Opens a new blank Deploy Once window for the selected package. |
|
Attach Schedules |
|
|
Attaches existing schedules to the selected package. (Enterprise mode required) |
|
Print Preview |
|
Ctrl+P |
Previews and prints or exports what is displayed on the console (deployments, schedules, packages, etc.). |
|
Import |
|
Ctrl+I |
Imports Packages and Target Lists. |
|
Export |
|
Ctrl+E |
Exports Packages and Target Lists. |
|
Save Data to File |
|
Ctrl+Alt+S |
Saves data for selected item in several formats. For example, you can save a list of the current packages in the Package Library. |
|
Exit |
|
Alt+F4 |
Closes PDQ Deploy. |
|
Edit |
Cut |
|
Ctrl+X |
Cuts the selected item. |
Copy |
|
Ctrl+C |
Copies the selected item. |
|
Paste |
|
Ctrl+V |
Pastes the selected item. |
|
Abort |
|
|
Aborts a deployment before completion. Stop the entire deployment or only selected target computers. |
|
Redeploy |
|
Ctrl+R |
Redeploys to all or selected target computers. |
|
Redeploy to Failed Computers |
|
Ctrl+Shift+R |
Redeploys to all failed target computers. |
|
Redeploy from Failed Step |
|
|
Redeploys from the step that previously failed. |
|
Delete |
|
Del |
Deletes the selected item. |
|
Rename |
|
F2 |
Renames selected item (for example, a Package or custom folder). |
|
Select All / Select None |
|
Ctrl+A |
Selects or deselects all items in a list or field. |
|
View |
Refresh |
|
F5 |
Refreshes the entire console including checking for updates. |
Package Library |
|
|
Opens the Package Library on the Main Console window. |
|
Edit Columns |
|
Ctrl+Alt+Shift+Z |
Opens the Edit Columns window. You can change the columns displayed, column order, and more. For details, see Data Grids. |
|
Item Appearance |
|
Ctrl+Shift+F2 |
Opens the Item Appearance window. For items in the tree, you can change the icon displayed and display as section header. For details, see Item Appearance Window. |
|
Reports |
Deployment |
|
|
Previews and prints or exports the Deployment Details report using the selected report profile. Select from Full Details, Summary, or a custom profile. |
Package |
|
|
Previews and prints or exports the Package Details report using the selected report profile. Select from Include Step Details or No Step Details. |
|
Package Library |
|
|
Previews and prints or exports the Package Library Details using the selected report profile. Select from Include Step Details or No Step Details. |
|
Schedule |
|
|
Previews and prints or exports the Schedule Details report that using the selected report profile. Select from Full Details, Summary, or a custom profile. |
|
Target List |
|
|
Previews and prints or exports the Target List Details report. |
|
Notifications |
|
|
Opens the Notifications window where Post Deployment emails and Post Schedules emails are created and edited. |
|
Options |
Credentials |
|
|
Opens the Credentials window to manage the administrative credentials used by PDQ Deploy. |
Variables |
|
|
Opens the Variables window to manage the Custom and System values stored by PDQ Deploy. |
|
Console Users |
|
|
Opens the Console Users window to manage the users that can access the console.. |
|
Central Server |
|
|
Opens the Central Server window. In Local mode, the window will show the options for setting up Server Mode or Client Mode. Once in Server Mode or Client Mode, the window will display the settings for the selected mode. |
|
Background Service |
|
|
Opens the Background Service window to modify the settings used by the Windows service PDQDeploy. |
|
Preferences |
|
Ctrl+Comma |
Opens the PDQ Preferences window to customize the console. |
|
Help |
User Guide |
|
F1 |
Opens the PDQ Deploy user guide documentation. |
PDQ.com Website |
|
|
Opens the PDQ.com website. |
|
Buy Enterprise License |
|
|
Opens the PDQ.com Purchase Licenses web page. (Available only in Free mode) |
|
Renew Subscription |
|
|
Opens the PDQ.com Existing Customer Sign In web page. (Available only in Enterprise mode) |
|
Try PDQ Deploy Enterprise |
|
|
Opens the PDQ.com PDQ Deploy Enterprise Mode Trial web page. (Available only in Free mode) |
|
Open Remote Repair |
|
Ctrl+Tilde |
Opens the PDQ.com Remote Repair utility. |
|
Open Elevated Command Prompt |
|
|
Opens a Command Prompt to be Run as Administrator. (Enterprise mode required to launch from within PDQ Deploy) |
|
Open Elevated PowerShell Prompt |
|
|
Opens PowerShell Prompt to be Run as Administrator. (Enterprise mode required to launch from within PDQ Deploy) |
|
Support |
|
|
Opens the different support web pages available from Admin Arsenal. Choose between Feedback & Support and Support Forums. Opens CPU troubleshooting. Choose between Profile Console CPU or Profile Background Service CPU. NOTE: Profiling should only be used as directed by PDQ Support. |
|
Check for Update |
|
|
Opens the Check for Update window with information and download options about available updates. |
|
Current Configuration Summary |
|
|
Opens a Notepad of select settings from Options, Preferences, and License. This file will mostly be used when seeking PDQ.com support. |
|
License |
|
|
Opens the License window. |
|
About PDQ Deploy |
|
|
Opens the About PDQ Deploy window that shows the currently installed version and license mode. |
Tree and Page
The tree contains all of the packages, deployments, schedules, target lists, and custom folders in your PDQ Deploy system. You can also access the PDQ Deploy Package Library from the tree.
Select an item in the tree to display its details in the page on the right. You can organize the tree by moving folders or creating custom folders for packages and target lists. While using Central Server, organization of the tree is on a per user basis.
The following table provides a description for each element in the tree.
Page |
Icon |
Description |
|---|---|---|
Welcome to PDQ Deploy |
|
Includes links to get you started with packages, to help and documentation resources, and to follow Admin Arsenal on social networking. |
All Deployments |
|
Lists all deployments in your system. |
All Schedules |
|
Lists all schedules in your system. |
Retry Queue |
|
Displays the list of computers waiting for packages to be redeployed. (Enterprise license mode required.) Only computers that failed due to being offline will be placed in the Retry Queue. |
Auto Download Packages |
|
Displays PDQ Deploy packages that are configured for Auto Download. If the package has been edited, the pencil will display over the icon. (Enterprise mode required.) |
Package Library |
|
Displays the ready-to-deploy packages created by PDQ.com. If you expand the Package Library, you can view packages by Categories or Vendors. The specific packages that you can download and deploy from the Package Library depends on your license mode. |
Folder
|
|
You can create custom folders for organizing packages, target lists, and other folders. Note: The default folder is named Packages. If this folder is deleted or renamed, the imported packages will be stored in the top level of the tree. |
Private Packages |
|
This folder is automatically added while using Central Server. Packages, target lists, and other folders created or copied into this folder cannot be seen by other users of the Central Server. Note: Reverting a console to Local mode will convert this folder to a regular folder appended with the console user's name. |
Package |
|
Displays any Standard package that is not auto downloading. Select a package to view its details, like associated deployments, schedules, and more. Packages can be dragged and dropped onto target lists to create a deployment (and vice versa). |
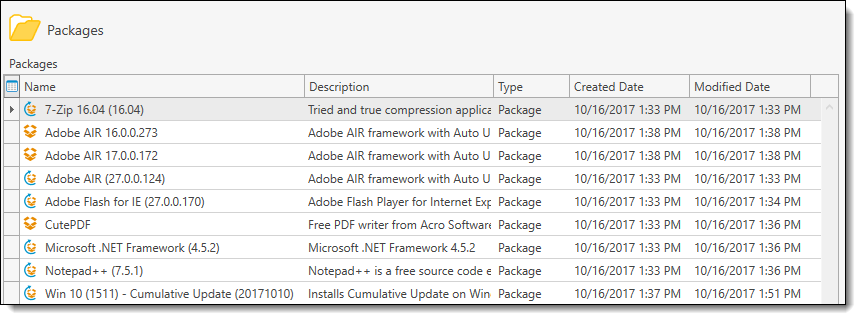
Example Page—Packages
Click the Packages folder in the tree to view the packages downloaded into your system on the Packages page. The list shows the package name, package type, and the created and modified dates.
Example Page—Specific Package
To view the deployment details for a specific package, do one of the following:
•Click on a package name in the tree.
•Click the Packages folder in the tree, right-click a package name from the Packages page, and select a GoTo 'Package Name' (or press Ctrl+G).
For example, on the Package page you can view the deployments, schedules, and the retry queue associated with the package. Additional controls may also be available on the page header, for example, the Deploy and Edit Package buttons. If the package is set to Auto Download, the approval will also display here.
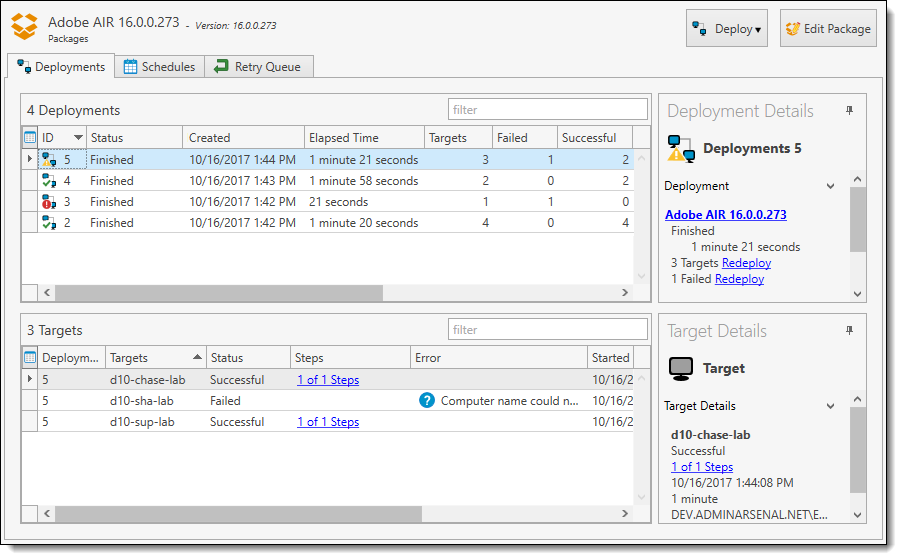
On many pages you can see additional details in the sidebars on the right side of the page. The sidebars can be pinned open ![]() (see Deployment Details in the sample screen) or collapsed
(see Deployment Details in the sample screen) or collapsed ![]() (see Target Details). Click the sidebar to show or hide the details. For more information about sidebars, see Details Sidebars.
(see Target Details). Click the sidebar to show or hide the details. For more information about sidebars, see Details Sidebars.
Example Page—Multiple Packages Selected
When multiple packages are selected in the tree (Shift+Click or Ctrl+Click), the Multiple Packages page opens on the right. From this page, you can perform the following actions:
•Create new package nesting these packages: A New Package window opens with each packages listed as a separate nested step. For details, see Creating a New Package and Nested Package Step Properties.
•Start a deployment with these packages: A Deploy Once window opens with each package selected to be deployed. For details, see Deploying Package(s) with Deploy Once.
•Create new schedules with these packages: A new Schedule window opens for all selected packages. For details, see Creating Scheduled Deployments.
•Attach packages to an existing schedule: The Select Schedules window opens. To attach the packages to an existing schedule, simply select the existing schedule and click OK, or double-click the schedule name.

Status Bar
The Status bar across the bottom of the PDQ Deploy Main Console window provides update information and links to the following:
•Updates to PDQ Deploy. For details, see Alerts.
•Updated packages in the Package Library.
•Auto downloads waiting for approval.
•Running deployments.
•(Beta version only) Link to PDQ Deploy beta feedback page.

© 2022 PDQ.com Corporation. All rights reserved.
PDQ.com is a trademark of PDQ.com Corporation. All other product and company names are the property of their respective owners.
Help Version: 19.3.254.0